
Schedule
Schedule is the page that says when the work will be done. Work items defined in Field Progress are tied here to a subcontractor and to a date range;
1. What it is for
Schedule is the page that says when the work will be done. Work items defined in Field Progress are tied here to a subcontractor and to a date range; the result is a schedule chart that runs from left to right.
A activity is a subcontractor carrying out specific work items within a specific date range. The length of the bar shows the duration, the fill inside it shows how much of that work is finished, and the arrows between bars show which job is waiting for which.
These are the questions the page answers: who has which job this week, which job has slipped, if I pull a job forward, where do the ones behind it move to and when does the programme finish. The schedule can be taken out as Excel, PDF and an AutoCAD drawing.
It is the only page in the app with a time axis. The other pages show a list; here the first axis is time and the second is the work.
2. Opening it, and who can see it
In the sidebar, Site Operations › Schedule.
| Your permission | What you can do |
|---|---|
| View | You read the chart, filter it, zoom it and export it. The New activity and Folder buttons are not drawn; bars cannot be dragged and the right-click menu comes up empty |
| Edit | Everything above, plus adding activities, changing dates, creating links, and defining folders and non-working days |
| No permission | The module appears dimmed and locked in the menu |
3. The anatomy of the screen
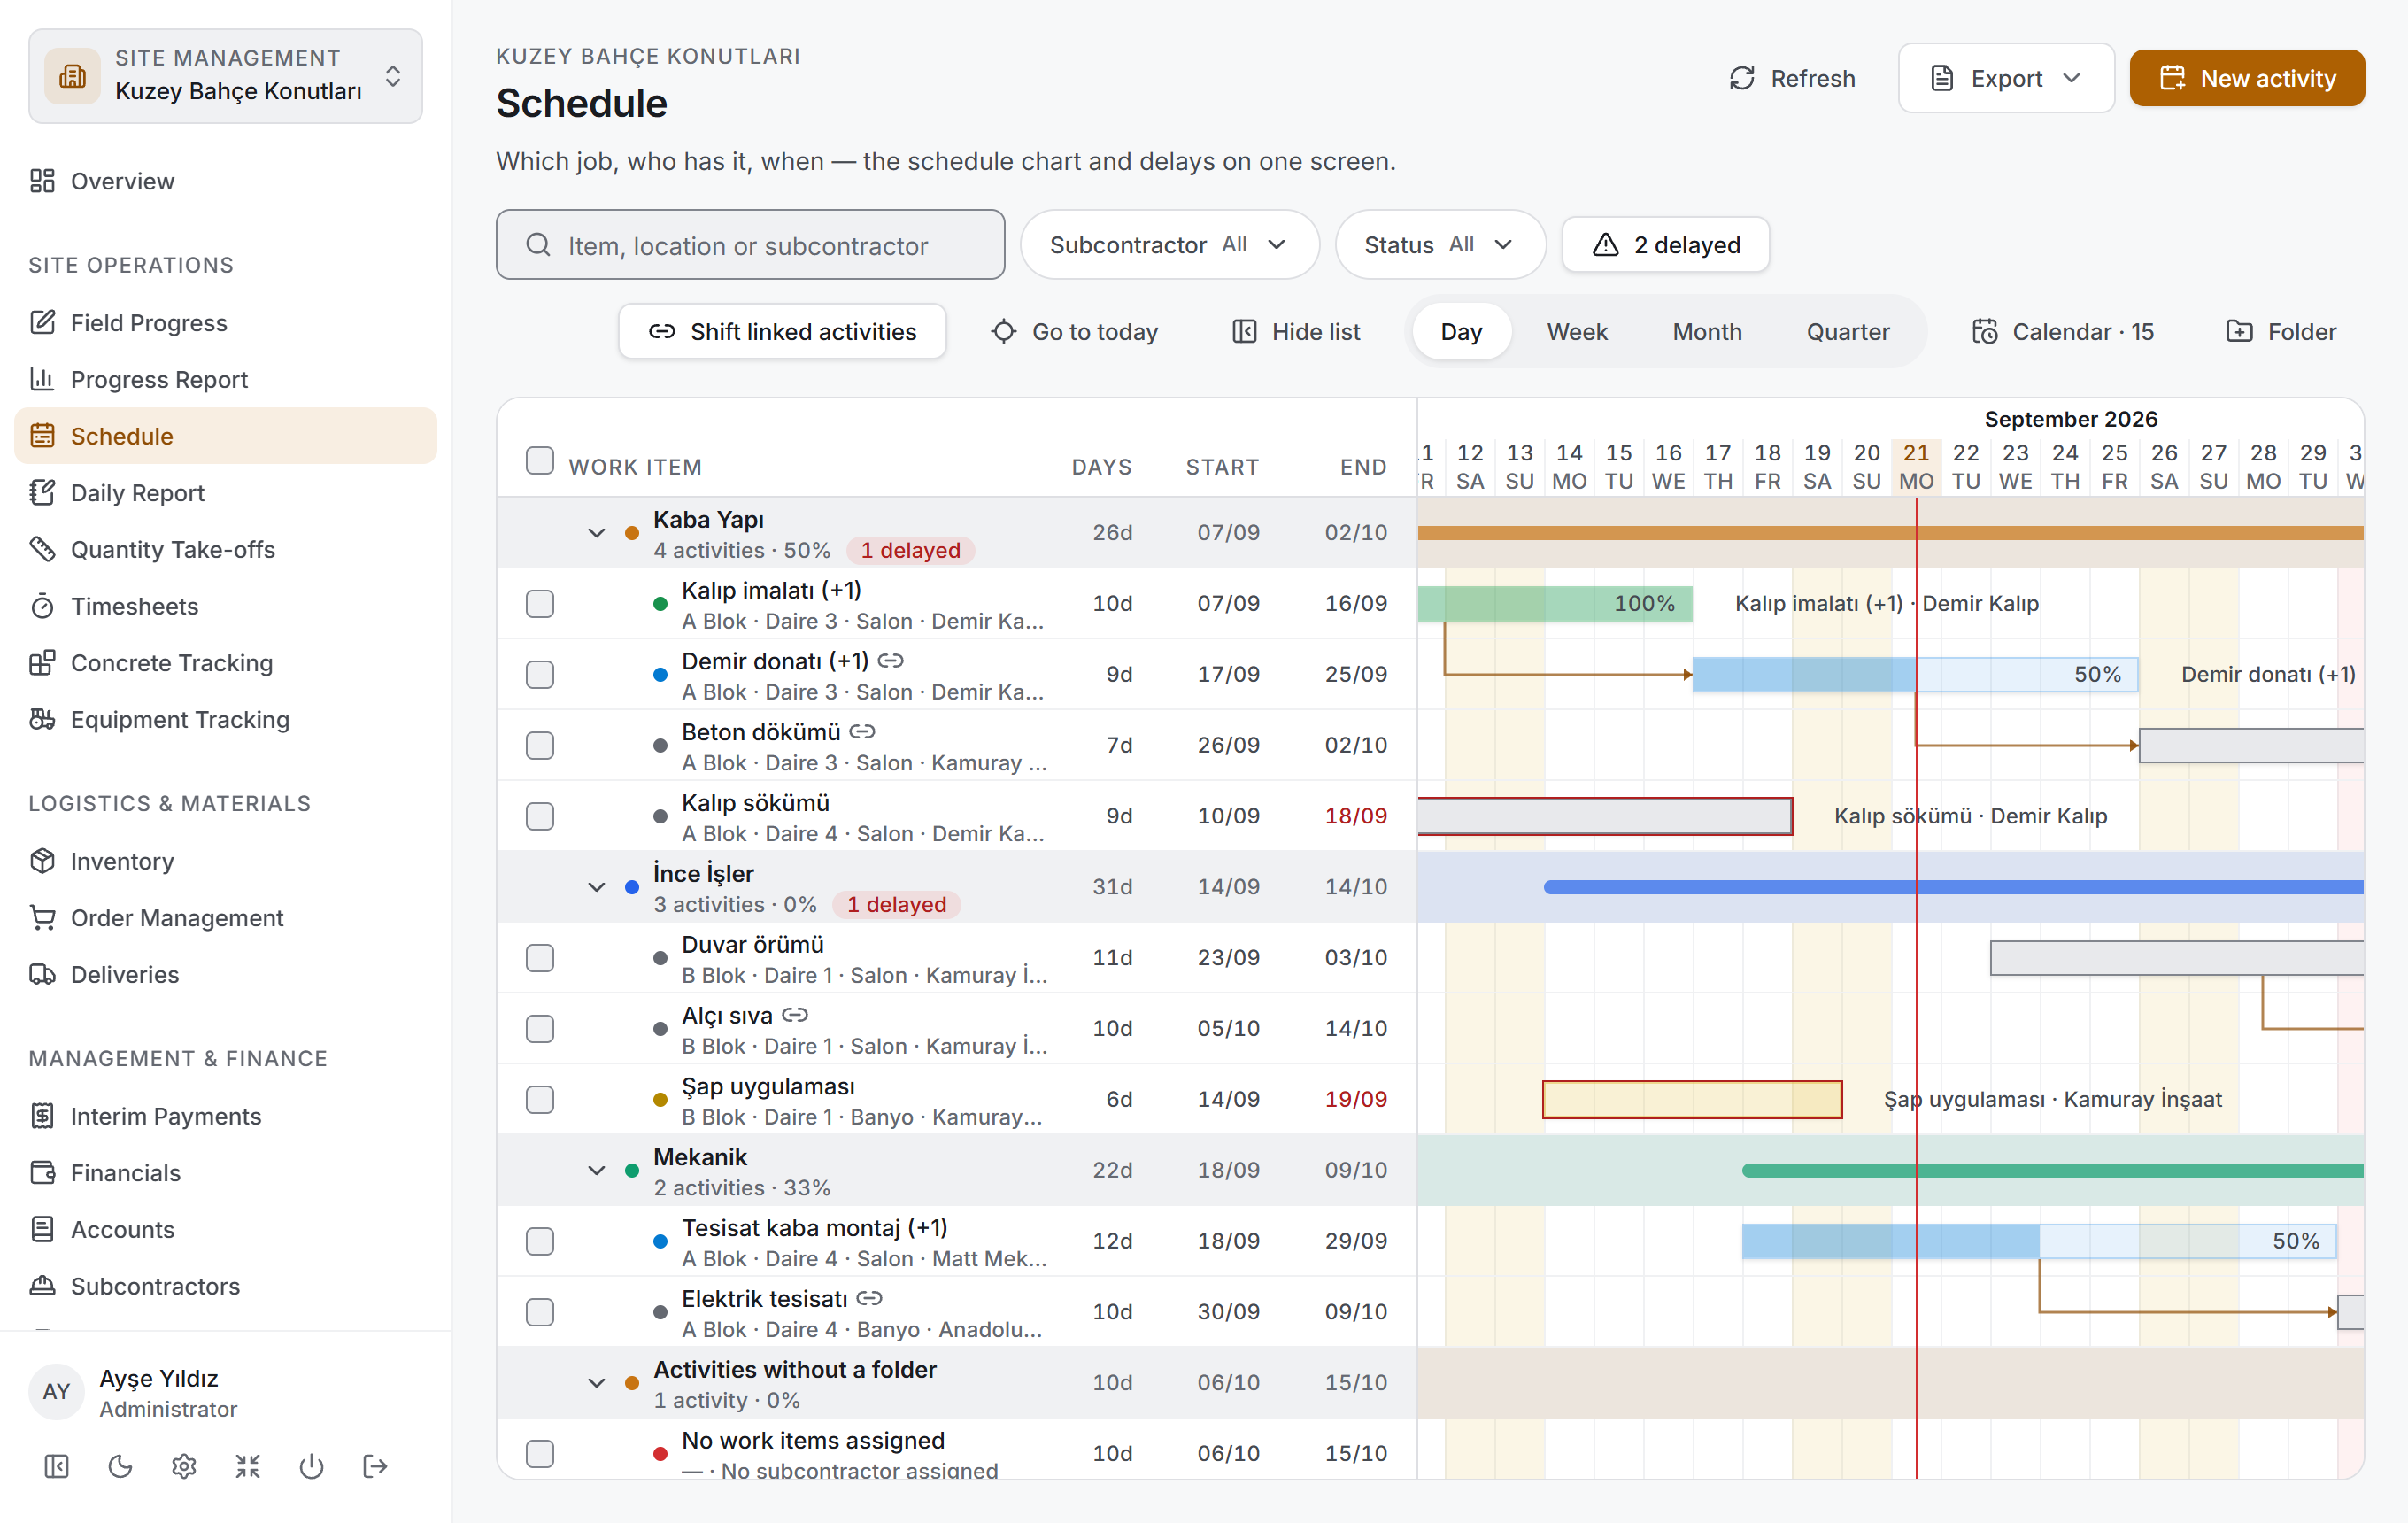
The page has three layers and the chart takes all the remaining height. There is no summary card above the chart: on a schedule chart the most valuable space on screen is the vertical space.
| Layer | What it does |
|---|---|
| Header | The page name, the project name and the actions: Refresh, Export, Import from MS Project, New activity |
| Toolbar | The buttons that decide what appears on the chart and how it appears |
| Chart | The job list on the left, the time axis on the right — inside a single scrolling area |
Header and buttons
The title is Schedule, with the project name above it and "Which job, who has it, when — the schedule chart and delays on one screen." below.
| Button | What it does |
|---|---|
| Refresh | Reads the schedule from the server again. It says Refreshing while it runs |
| Export | Opens a menu: Download Excel, Download PDF (chart), Download DXF (AutoCAD), Download MS Project XML (whole schedule) (see 5.14). It says Preparing… while it runs |
| Import from MS Project | Brings in activities from an MS Project XML file (see 5.14). Only visible to people who can edit |
| New activity | Opens the empty activity window |
The Export button is dimmed if the filter brings back no activities — the export of an empty schedule is an empty file. When a file is saved, a green strip appears under the header with the full path of the file; you close the strip yourself with Close.
The toolbar

The toolbar has two groups. The first group decides what appears on the chart:
| Item | What it does |
|---|---|
| Search activities | Searches the work item name, location, subcontractor, note and status name at once |
| Subcontractor | The subcontractors that have work in the schedule; each one shows how many activities it has |
| Status | Those of the five statuses that actually occur on screen |
| N delayed | Filters down to the delayed activities. It turns red while pressed |
The second group decides how the chart looks:
| Item | What it does |
|---|---|
| Shift linked activities | When on, later activities linked to a moved activity are rescheduled by their dependency type and lag, in workdays |
| Go to today | Scrolls the chart so that today's line is centred |
| Hide list | Closes the left list and gives the full width to the chart. Pressing it again says Show list |
| Time scale | Day · Week · Month · Quarter — four zoom levels |
| Calendar | Opens the non-working days window. If days are recorded it also writes the count: Calendar · 12 |
| Folder | Opens the new folder window |
In a wide window both groups fit on one line; in a narrow one the second group wraps to the line below. Their order never changes.
The left list
The list is a tree: folders and the activities under them. Activities that are in no folder are collected under Activities without a folder.
An activity row has two levels: the work item name on top, the location and the subcontractor below it. The coloured dot in front of the name is the status, and the chain mark next to it says Linked to a previous activity. On the right there are three number columns: DAYS, START, END. The end date is written in red on a delayed activity.
A folder row writes its own colour, its name, how many activities it holds and the total completion rate; if there is a delay inside it, a red number appears next to it. The columns on the right show the number of days the whole folder covers and its first and last date.
You can widen or narrow the list by dragging the thin separator between the list and the chart.
The chart
The right-hand side carries a two-line header and a background beneath it.
| Item | What it says |
|---|---|
| Upper header line | Month, quarter or week — depending on the scale |
| Lower header line | Day numbers (if the scale is wide enough) |
| Shaded columns | Non-working days. Hovering over one shows its description |
| Red vertical line | Today |
| Coloured band | The time range a folder covers |
| Bars | The activities |
A bar has square corners and takes its colour from the status. The lighter fill inside it shows the completion rate; if the bar is wide enough, the rate itself is written inside it. The work item name and the subcontractor are always written to the right of the bar — the position does not change however narrow the bar gets. The bar of a delayed activity carries a red frame.
The arrow between two bars says that the later one is linked to the earlier one. It leaves the predecessor from its bottom edge and enters the successor from the left.
The bar details card

When you hover over a bar, a small card opens below it: the activity name, the status badge, the location and four lines — Subcontractor, Dates, Work items, and Delay if there is one. If the activity has a note it appears at the bottom of the card. The card is there so that you can read it without leaving the chart.
4. Fields
The fields in the activity window
| Field | What it means | Required |
|---|---|---|
| Subcontractor | The company that will do the work. It comes from Subcontractors | Yes |
| Status | Planned · In progress · Postponed · Completed · Cancelled | No, the default is Planned |
| Folder | Which heading the activity will sit under in the list | No |
| Start | The first day of the bar | Yes |
| End | The last day of the bar. Above the box it says how many calendar days the activity comes to | Yes |
| Previous activity | The activity this one waits for. Selecting it draws an arrow on the chart | No |
| Scope of work | The work items the activity covers. The completion rate is calculated from them | No, but with an empty scope the rate stays at 0% |
| Name | Only shown on an activity with no work items selected. The activity appears in the list and on the chart under this name; if it is empty, No work items assigned is shown. Up to 200 characters | No |
| Notes | Free text. It appears on the bar's details card | No |
The values read from the chart
| Value | How it is calculated |
|---|---|
| Days | The number of calendar days, start and end included. Non-working days are counted too |
| Completion | The site progress of the linked work items: Done counts 100%, In progress its entered partial percentage, the rest 0; every work item weighs the same, one decimal place. The same calculation as the Progress Report and the Overview |
| Status | By the rule below; partly measured, partly read from the record |
| Delay | On activities whose end date has passed and that are still not finished, how many days have passed since the end date |
The status comes from two sources. If the record says Cancelled or Postponed, that is what stays — these are a decision, not a measurement. The other three are measured: if every work item in the scope is finished the status is Completed, if one is finished or has a partial percentage it is In progress, and if there is no progress at all it is whatever the record says.
The non-working day fields
| Field | What it means |
|---|---|
| Date | The day that will not be worked |
| Type | Weekend · Public holiday · Site-specific |
| Description | Free text, shown when you hover over that day on the chart |
5. Step by step
5.1 Creating an activity
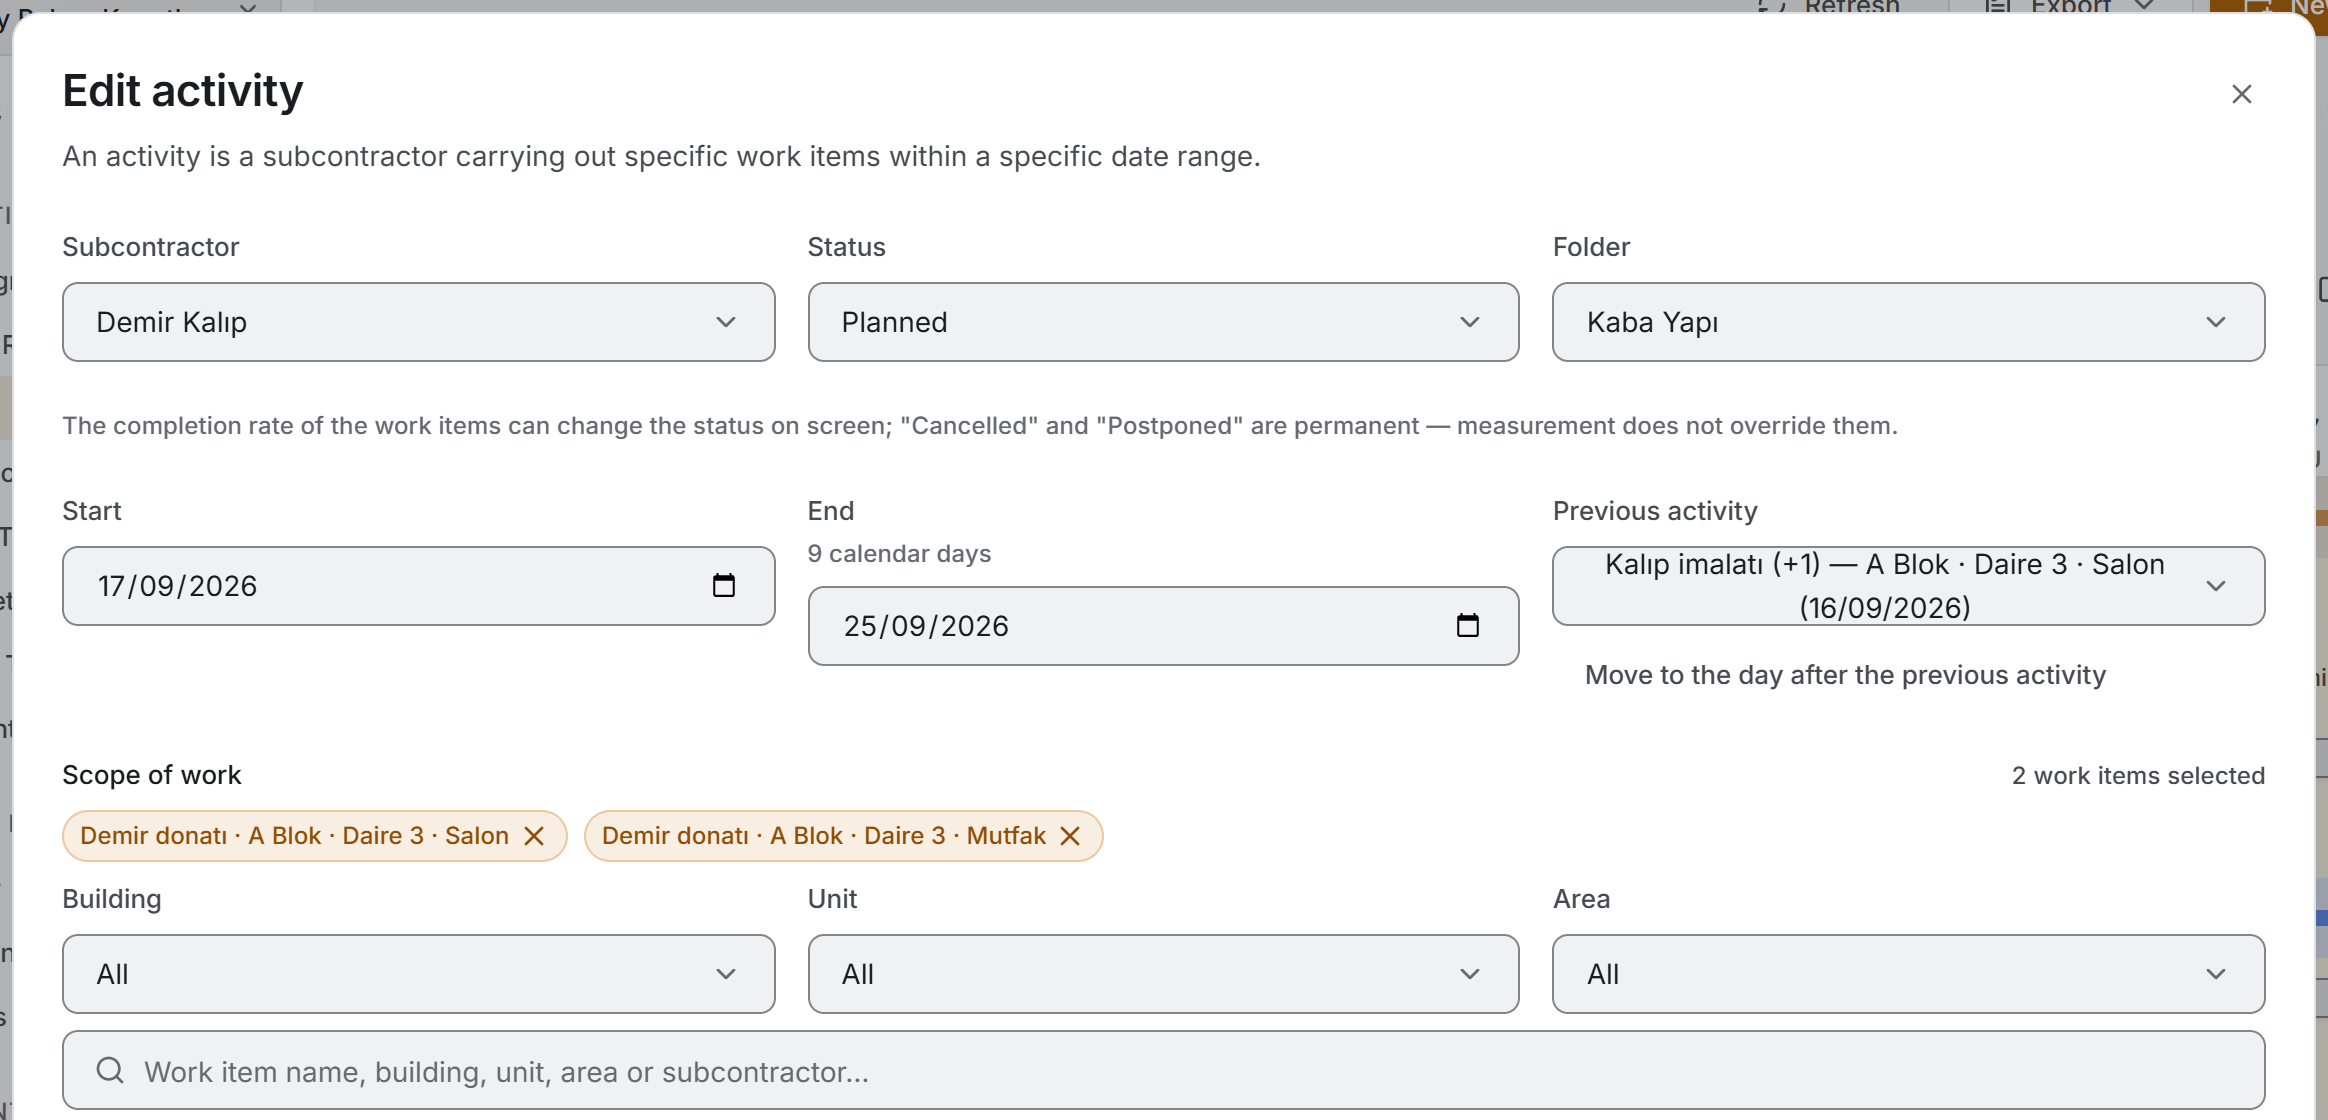
- Press New activity in the header. To add it straight into a folder, right-click that folder and choose New activity inside.
- Fill in Subcontractor, Start and End. When you pick the start date and the end is empty, the end is pulled to the same day; a one-day activity is the most common shape.
- Choose Status, Folder and Previous activity if you need them.
- Tick the work items the activity covers under Scope of work.
- Write Notes if you want to, and press Create.
If a required field is empty, a warning appears at the top of the window: "Subcontractor, start date and end date are required." If the end date is before the start date a separate warning appears and nothing is saved.
5.2 Choosing the scope of work
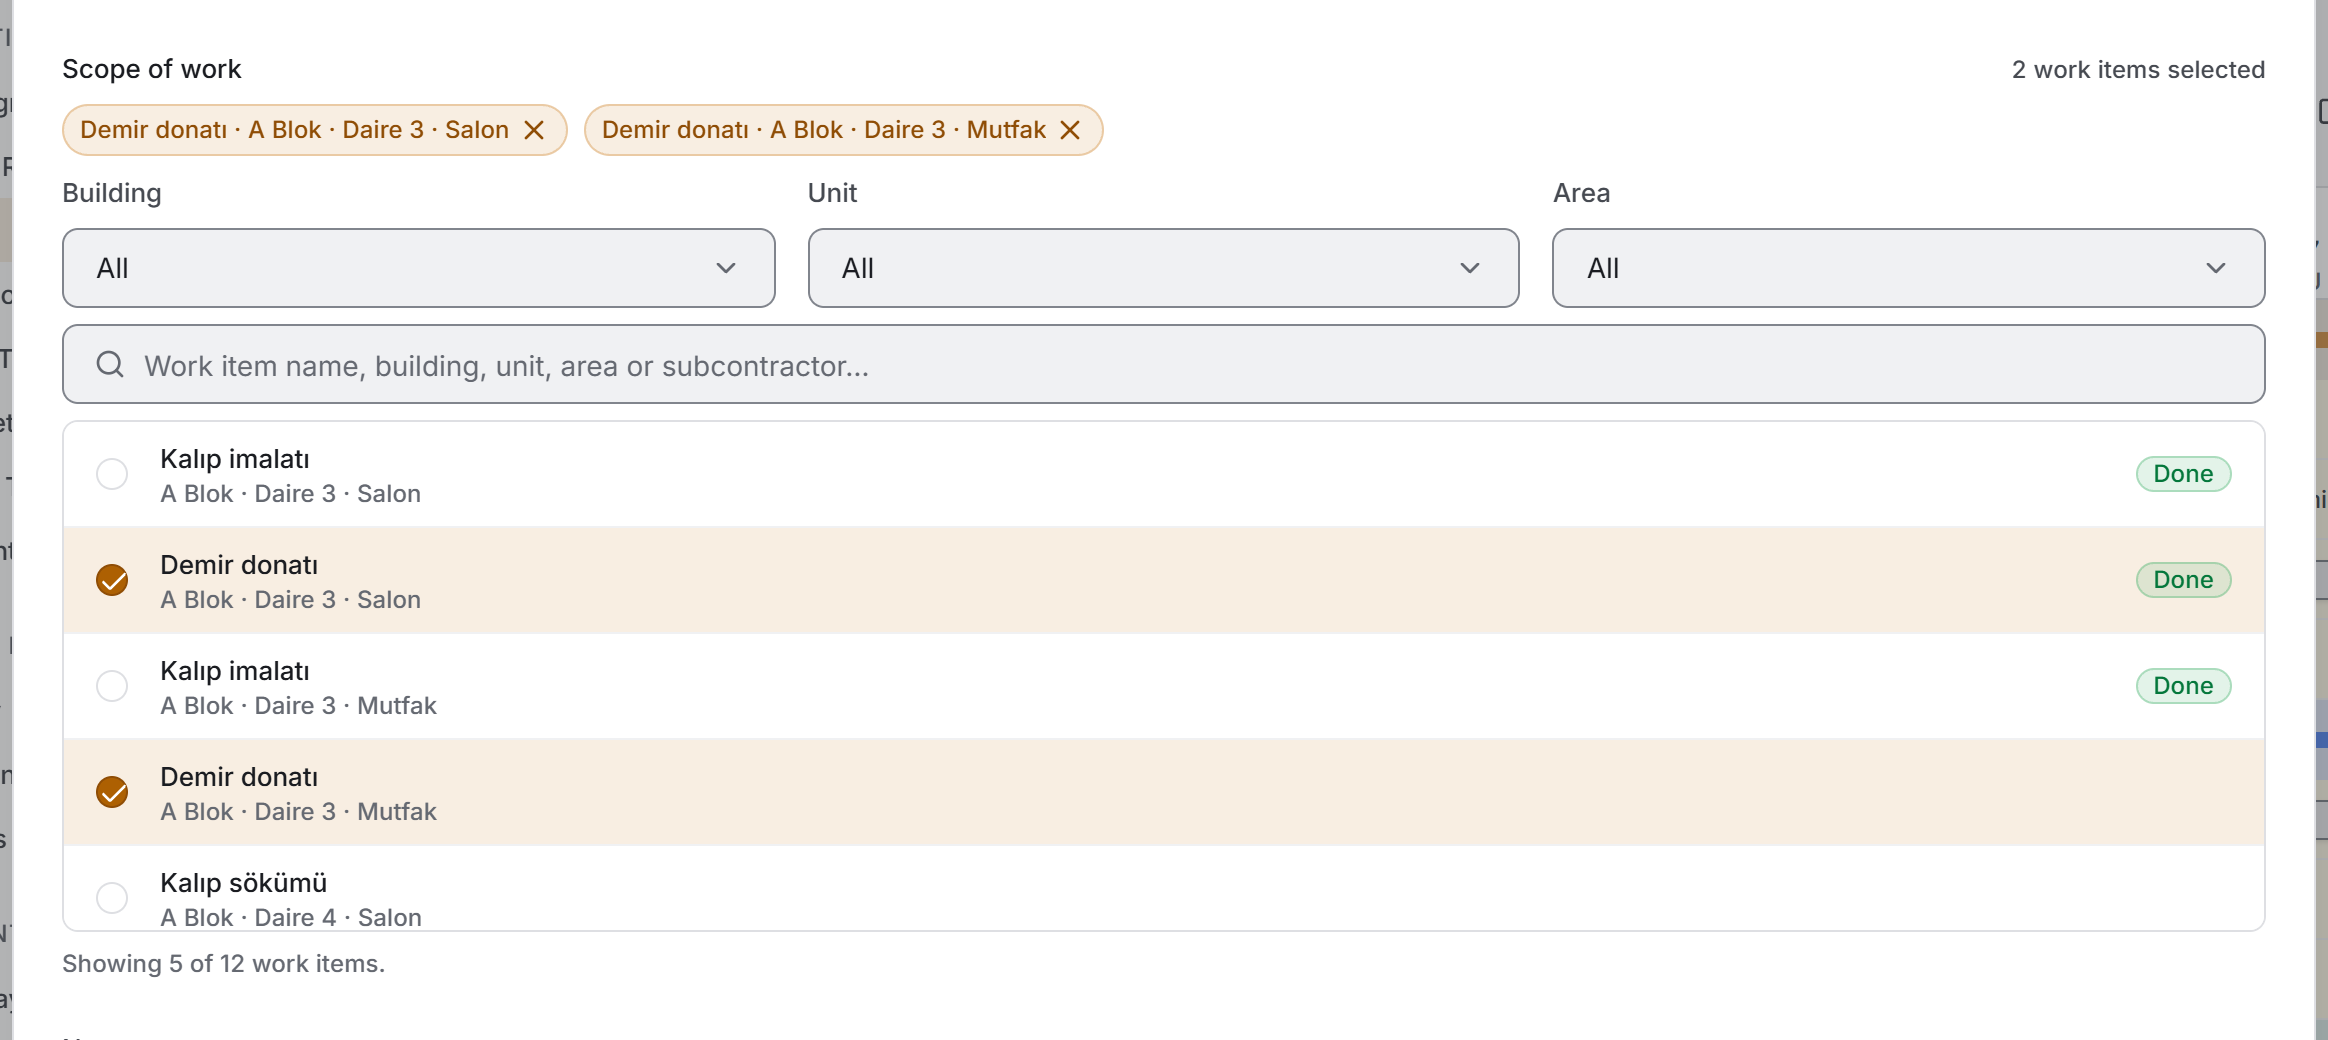
A project can hold thousands of work items; the window narrows the list in three stages.
- Fill in the Subcontractor box at the top of the window — the activity's subcontractor also narrows this list. It comes down to the work items assigned to that subcontractor and those that have no subcontractor yet; work assigned to another subcontractor drops out.
- Narrow the location with the Building, Unit and Area boxes. All three are optional; when an upper level changes, the ones below it return to All.
- Type into the Search work items box. The search moves inside the narrowed pool.
- Tick an item by clicking its row. What you pick collects at the top of the list as removable chips; items already finished on site carry a Done badge.
The line under the list says how many work items are shown. If the pool holds more than 300 records, only the first 300 are drawn and you are asked to narrow it down; as the filters do their work, that warning disappears on its own.
When the pool empties, the list says "No work items for the selected subcontractor and location. Loosen the filters." — that is, it says the problem is in the filters, not in the search.
5.3 Changing dates from the chart
There is no need to open a window; the bar itself carries three handles.
- Grab it by the body and drag — the activity moves forward or back without its duration changing.
- Pull its right edge — the end date changes and the start stays where it is.
- It is written when you let go. While you drag, the new date range appears next to the bar.
5.4 Linking two activities
- Hover over the predecessor bar. A small ring appears at its right end.
- Grab the ring and drag it onto the successor bar. A dashed line follows you while you drag, and a valid target is highlighted.
- Let go. The predecessor is added to the successor's Dependencies list as a finish-to-start (FS) dependency, and an arrow is drawn between the two bars. The successor does not move: the gap between them is recorded as lag. A dependency that would create a loop (A → B → A) is not added, and a note appears on screen.
An activity can have several predecessors. To remove all of them, right-click the successor and choose Remove link; remove a single dependency in the activity window.
Duration and dependency types. In the activity window the duration is entered in workdays; the end date skips the company's weekend setting and the non-working days in Calendar. If you pick the end date yourself, the duration is counted from the two dates. In Dependencies, Add dependency lets you choose the predecessor, the type and the lag:
| Type | Meaning |
|---|---|
| Finish-to-start (FS) | The successor starts on the workday after the predecessor finishes |
| Start-to-start (SS) | The successor starts on the same day as the predecessor |
| Finish-to-finish (FF) | The successor finishes on the same day as the predecessor |
| Start-to-finish (SF) | The successor finishes on the workday before the predecessor starts |
Lag is in workdays; a negative value is a lead. Example: 29 October is a holiday, and A starts on Monday 26 October and lasts 5 workdays, so A finishes on 2 November. A 3-day B linked FS+2 lands on 5–9 November, C linked SS starts on 26 October, and a 3-day D linked FF−1 lands on 27–30 October. An activity with dependencies takes its start from them; with several, the latest wins. When you save an activity, the later activities linked to it are rescheduled too. On the chart the arrow shape shows the type; dependencies other than plain FS carry a short label at the arrowhead (SS, FS+2, FF−1).
5.5 Shifting the chain together
When Shift linked activities is on and you move an activity, the later activities linked to it are rescheduled by their dependency type and lag, in workdays. When it is done the screen says "3 linked activities were also shifted." The lag of the moved activity's own dependencies changes by the same number of workdays, so the activity stays where you dropped it.
When it is off, only the activity you are holding moves; the arrows stay where they are and the overlap becomes visible on screen.
5.6 Moving around the chart
| What you want | How |
|---|---|
| To zoom | Ctrl + mouse wheel, or the Time scale on the toolbar |
| To move sideways | Alt + wheel or Shift + wheel |
| To drag freely | Hold the middle mouse button and drag |
| To come back to today | Go to today |
| To give the chart the full width | Hide list |
While you zoom with Ctrl, the day under the pointer stays where it is; moving between two levels does not drop you somewhere else in the schedule.
5.7 Organising with folders
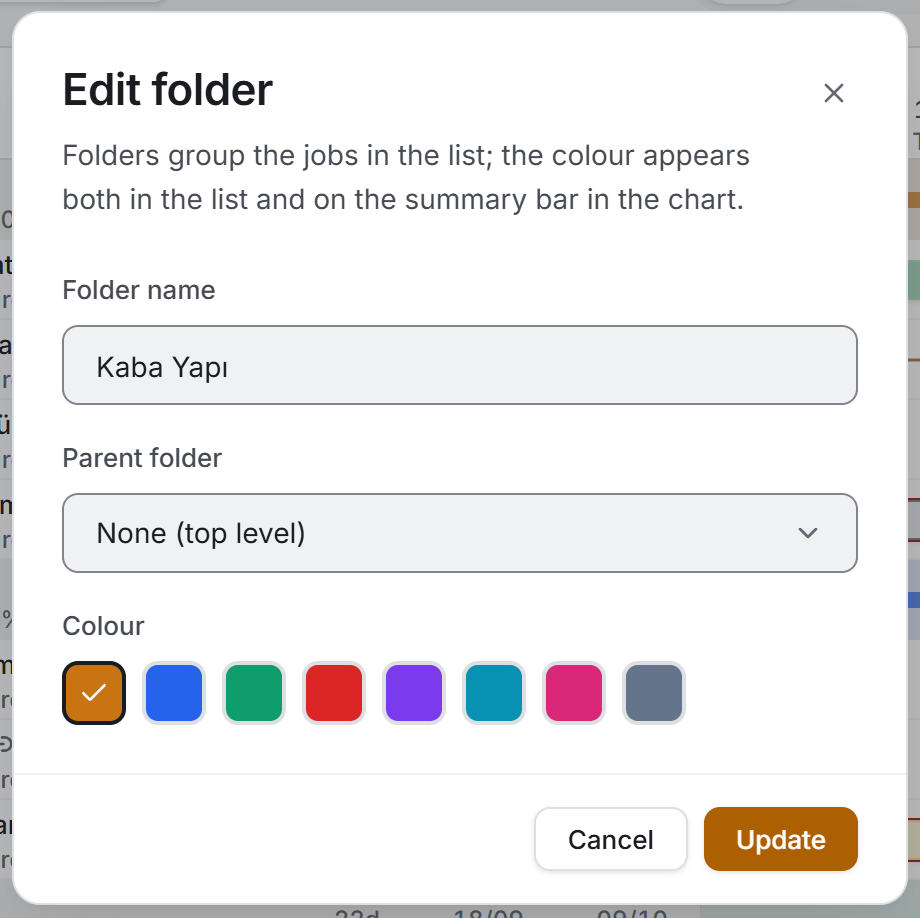
Folders group the jobs in the schedule — Structural work, Finishes, Mechanical and so on.
- Press the Folder button on the toolbar; to put it under another folder, right-click that folder and choose New subfolder inside.
- Write a Folder name, choose a Parent folder if you need one, and pick one of the eight colours.
- Press Create.
The colour appears both as the dot in the list and as the band on the chart. To move an activity into another folder, grab its row in the list and drag it onto the target; as you move it to the right the row indents and shows you in advance where it will land.
5.8 Defining non-working days
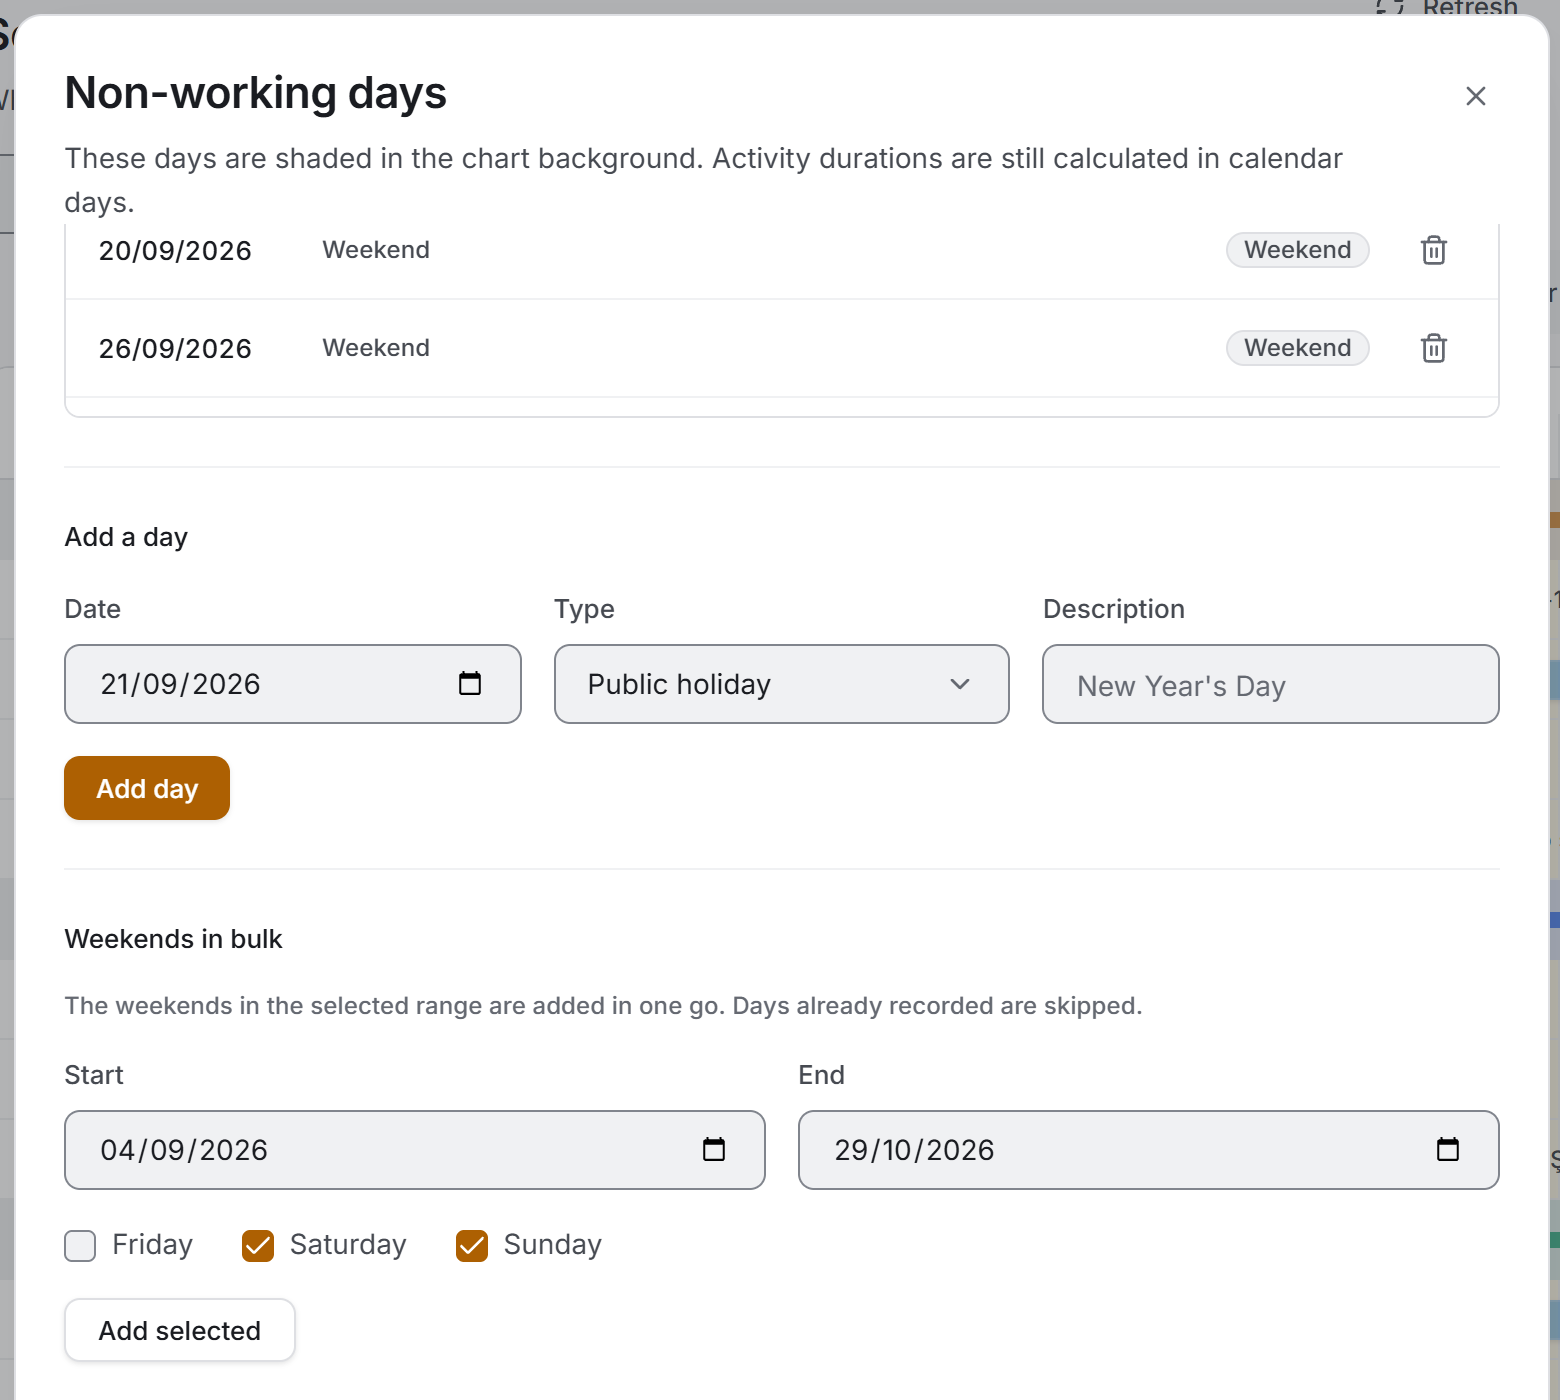
- Press the Calendar button on the toolbar.
- In the Add a day section pick the date, mark the Type and write a description if you want to — New Year's Day, for instance. Press Add day.
- Instead of entering weekends one by one, use the Weekends in bulk section. The date range comes ready with the chart's current range; tick Saturday and Sunday as you need and press Add selected. When it is done it says how many days were added.
The recorded days are listed in the upper half of the window; the bin at the end of each row deletes that day.
5.9 Deleting an activity
- Right-click the activity and choose Delete.
- The window that opens says what will happen: the work items linked to the activity stay on the server and only lose their place in this schedule; the links from later activities that follow this one are broken.
- Press Delete.
5.10 Deleting several activities at once
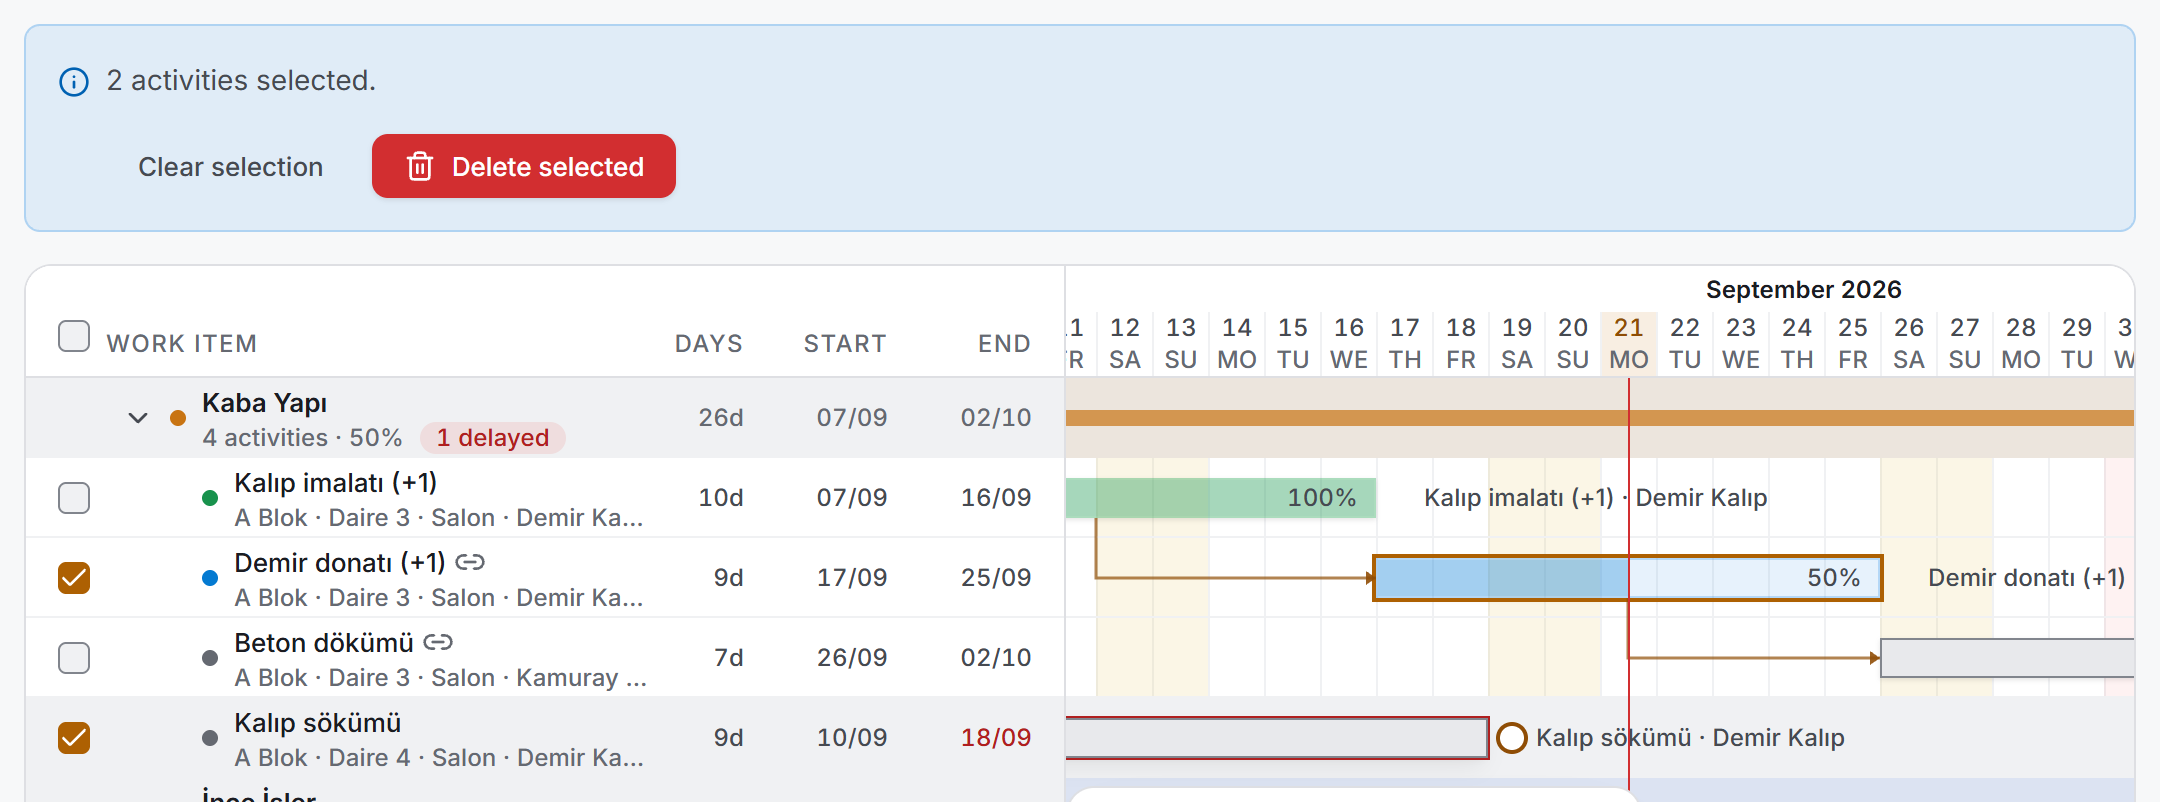
- Tick the boxes at the start of the activity rows in the list. The box in the header selects every visible activity. Ctrl + click flips a single record and Shift + click adds the rows in between; both also work on the bars.
- A strip appears saying "7 activities selected."
- Press Delete selected and confirm. The window writes the names of the first five activities and collects the rest as "… and 3 more activities."
When it is finished it says how many were deleted. If some of them could not be deleted that is said too, and the ones that failed stay selected, so you do not have to tick them again to try once more.
5.11 Freezing the plan (baseline) and tracking variance
A baseline is the schedule frozen at a point in time: the start, finish and workday duration of every activity are kept under a name and a date ("Contract programme", "Revision 1"). Several baselines can be kept; one of them is the compared baseline.
- Open the Baseline button in the header and choose Freeze plan (take baseline)….
- Type a name (Contract programme is suggested for the first one, Revision N after that) and choose Freeze. The project's first baseline becomes the compared one on its own.
- To compare with another baseline, pick it from the same menu; No comparison removes the grey bars.
While a comparison is on, a thin grey bar under each activity shows the baseline and the list gets a VARIANCE column: the finish difference in workdays, +2 late (red), −1 early (green). Hovering over a bar shows the baseline dates and the start and finish variance as a sentence ("+2 workdays late"). An activity added after the baseline carries a New badge; activities that were in the baseline but have since been deleted are listed by name in the yellow strip above the chart.
Example: the baseline was taken while A took 5 workdays. When A is extended to 7 workdays, B, linked to it finish-to-start, slips by two workdays and its row shows +2. If you then take a second baseline and switch the comparison to it, every variance becomes 0.
Taking, renaming and deleting baselines, and changing the project's compared baseline, need Planning edit access on the project (administrators always have it). Someone without it sees the list and can change the comparison on their own screen only. Baselines are renamed and deleted in the Manage baselines… window.
5.12 Critical path and float
The schedule works out the critical path by itself every time it opens; there is nothing to choose. Float is how many workdays an activity can slip without delaying the end of the project. The activities with the least float (normally 0) are the critical path: if one of them slips by a day, so does the project.
- Critical activities are drawn with a thick yellow outline, and the links between them as thick yellow arrows.
- The FLOAT column in the list shows the total float in workdays (0d, 6d); critical ones are yellow.
- The Critical path · N button in the toolbar shows only the critical activities; press it again to bring back the whole schedule.
- Hovering over a bar shows the Early and Late date ranges, the Total float and the Free float (how far it can slip without delaying the next activity).
Example: A takes 5 workdays, B is linked to it FS+2, C SS and D FF−1. A and B are critical (float 0); C and D can slip by 6 workdays without moving the project.
The calculation uses the link types and lags, the company weekend and the project's non-working days. An activity with no links starts on its saved date. An activity moved later by hand on the chart is treated as not starting before that date, and the gap becomes float for its predecessor. A completed activity stays fixed on its saved dates and still drives the next ones, but no float is counted for it; cancelled and undated activities are left out. Whatever the filter, float is counted over the whole schedule.
5.13 Look-ahead list
The Gantt chart · Look-ahead switch at the start of the strip turns the schedule into the site meeting list. It shows the activities that fall in a 2, 3 or 6-week window starting today: work that starts, continues or finishes in the window, and work past its finish date that is not finished. Weeks are 7-day blocks starting today, so the window is always exactly two, three or six weeks.
- Group by: By week (an activity goes to the week of its first day inside the window; overdue work comes first under Past finish date, not finished), By subcontractor or None.
- Columns: activity and location, subcontractor (who does the work), dates and duration in workdays, progress percentage and status, In this window (Starts, Ongoing, Finishes, Starts and finishes, Overdue), FLOAT when the critical path is calculated, VARIANCE when a baseline is compared. On the right is the window's day grid: the bar shows only the part inside the window, critical activities have a yellow outline and the baseline is a thin grey line.
- The search, subcontractor, status, delayed and critical path filters on the strip also apply to this list. Clicking a row opens the activity window.
- Completed, cancelled and undated activities are not listed.
Download PDF (meeting) writes the same list on a landscape page in the company's paper size (Letter in the US, A4 elsewhere): the header gives the window, the number of activities, the grouping and the baseline; below come the notes, a meeting date and place line, a ruled area for meeting notes and three signature spaces (Prepared by, Site manager, Subcontractor representative). Download Excel writes the same rows on a sheet with day columns; the file name starts with Look_Ahead_Schedule_…. On the phone the Look-ahead list is read-only (2, 3 or 6-week window, grouped by week or by subcontractor); PDF and Excel are desktop only.
5.14 Exchanging schedules with MS Project (XML)
The schedule can be handed to MS Project, and a schedule prepared in MS Project can be brought in here. In both directions the file is in MS Project XML format. In MS Project or ProjectLibre it is saved with Save As › XML and opened the same way.
Exporting. Choose Export › Download MS Project XML (whole schedule). The file holds the whole schedule whatever the filter; links and the critical path are counted over the whole plan, so a filtered schedule would leave broken links.
- Folders become summary tasks, with their activities beneath them.
- Durations are in workdays. The calendar is the company's weekend plus the project's non-working days.
- Link types (FS, SS, FF, SF) and lags are written as they are. Each activity gets its saved start as a "start no earlier than" constraint, so MS Project calculates the same dates and the same critical path.
- The completion percentage, the subcontractor (as a resource), the compared baseline, the critical path and float go into the file too. A cancelled activity is an inactive task.
- The task name is the work item's name and location for an activity with work items, and the Name field for one without; if the Name is empty the task is written without a name. The activity's note becomes the task note.
- Activities without dates and empty folders are left out; the strip says how many.
Importing. The Import from MS Project button in the header is only visible to people who can edit the Schedule.
- Press Import from MS Project and pick the file with Choose XML file.
- The window reads the file first and shows it: the number of activities, folders, links and warnings, the resources that match none of this project's subcontractors, a note if the file's calendar differs from this project's, and the activity table (first 500 rows). Nothing is written at this stage.
- Press Import. If the project already has activities the button becomes Add as new: the file's activities are added as new records, the existing schedule is not touched, and there is no merging or overwriting. If you do not want that, press Cancel.
- The window says how many folders and activities were added. If writing stops halfway it says what was added and what was left.
Each imported activity's name goes into its Name field and the note from the file into Notes. The activities are not linked to work items or rooms, so no progress, interim payment or cost record is created. You can pick the work items later in the activity window; the list then shows the work item's name, and the name entered is kept.
The rules applied when reading the file:
| In the file | In the schedule |
|---|---|
| Start and finish | Taken as they are, never rescheduled. The workday duration is counted with this project's calendar; a warning appears if it differs |
| Milestone (zero duration) | A one-workday activity |
| 100% · above 0% · inactive | Completed · In progress · Cancelled |
| Resource | If its name is the same as one of this project's subcontractors, that subcontractor is assigned; otherwise the activity is added without one. No new subcontractor is created |
| Several resources | Only the first one is matched |
| A link to or from a summary task, a link that makes a loop, a second link to the same predecessor | Not taken; listed in the warnings |
| A task without dates | Not taken |
The file can have up to 3,000 activities and be up to 25 MB. MS Project's own .mpp file cannot be read; the window says so — save the file as XML and choose it again.
6. Exports
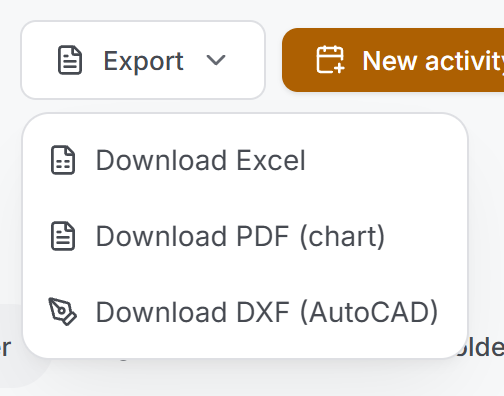
All three exports write the filter that is on screen. When you press the button the Windows save window opens; the file name comes ready as Schedule_… with a date stamp at the end. If you press Cancel nothing is written.
Excel
A workbook with three sheets:
| Sheet | What is in it |
|---|---|
| Schedule | The activity rows, together with their folder |
| Subcontractor Load | Who has how many activities, how many days, how many are delayed, and the completion rate |
| Non-working Days | The calendar records: date, type, description |
The columns of the Schedule sheet are: Folder · Work item · Location · Subcontractor · Status · Start · End · Days · Work items · Completed · Rate % · Delay (days) · Previous activity · Note.
Each sheet opens with the project name, the date and the filter that was applied. The header row is frozen and carries an auto-filter. Numbers are written as real numbers and dates as real dates; whoever opens the file can build their own calculation.
A landscape A4 document, and what is inside it is the chart itself — a drawing, not a table.
- The top of the first page carries SCHEDULE, the project name and the date it was prepared. The strip below writes the schedule range, the number of activities, and the numbers in progress, delayed and completed.
- The left column carries the WORK ITEM / FOLDER details, and the bar of that row is drawn to its right. The time axis is fitted to the width of the page.
- The day lines, day numbers, non-working day shading, dependency arrows, completion fill and delay marks are the same as on screen.
- A dashed red line marks the day the document was prepared.
- The chart is followed by the Subcontractor load table, and notes at the very end.
- The bottom of every page carries the project name, the document name and the filter applied.
If the scale becomes too narrow, the day lines and day numbers are not drawn; a squeezed grid would turn into an unreadable grey block.
DXF (AutoCAD)
The CAD drawing of the schedule. The same chart, written out in layers:
| Layer | What is in it |
|---|---|
0-FRAME | The frame and the header grid |
0-DAY · 0-HOLIDAY | Day lines and non-working day columns |
1-TEXT | Work item names, rates, dates |
2-FOLDER | Folder bands |
3-TODAY | Today's line |
4-LINK | Dependency arrows |
BAR-… | The bars, five separate layers by status |
The layers are there so that you can switch off what you do not want when you bring the drawing into your own sheet: if the day grid is too busy, 0-DAY is turned off and the chart itself stays.
The long schedule warning
If more than 400 rows go into the chart, the PDF asks first: "The schedule is very long." The window says how many rows will be printed and that the window may not respond for a few seconds while it is prepared. To carry on, press Prepare anyway.
7. Things worth knowing
The duration is in calendar days. Non-working days are shaded in the background of the chart but do not affect the duration. A five-day job that runs across a Sunday is still five days. This is a deliberate decision: the definition of a "working day" changes from site to site, and a schedule whose day count did not match the difference between two dates on the calendar would create a bigger confusion.
The completion rate comes from Field Progress. For an activity's bar to fill, the work items in its scope have to be marked Done there, or given a partial percentage while In progress. Example: in a 3rd floor plaster activity with four rooms, entering 10% for one room makes the activity 2.5% and In progress; the Progress Report and the Overview show the same number. Nothing can be marked done from this page.
Cancelled and Postponed are not overwritten by measurement. Every other status is calculated from the work items in the scope, but these two stay as the record has them. A work item inside a cancelled activity being done on site does not turn the activity back into In progress.
An activity with no dates has no bar. Records that came from the old application, or whose dates were cleared, stay in the list, show a dash in the days column and appear nowhere on the chart. The notes line of the exports says how many such activities there are.
A delay is an alarm, not a status. Every activity whose end date has passed and that is still not completed counts as delayed; you do not have to select a status as well. Cancelled and Completed activities produce no delay.
Search and filter work together. The search box searches the work item name, location, subcontractor, note and status name at once, while the filter chips narrow the pool. When both are on, the result is the intersection of the two.
The rate inside a bar is not always written. When the bar stays narrow the rate is not written but the fill is still visible; to read the number, either zoom in or hover over the bar and look at the details card.
The schedule is a snapshot. The data comes down once when the page opens and does not refresh by itself while you work with the filters. If someone else has added an activity in the meantime, you have to press Refresh to see it.
The successors of a deleted activity are set free. Deleting first breaks the links of the records that point to that activity as their previous activity. That is why some arrows disappear after a deletion; what is lost is not the arrow but a link that no longer exists.
Fields left empty have a stand-in in the list. An activity with an empty scope and an empty Name appears as No work items assigned, an activity without a subcontractor as No subcontractor assigned, and activities that are in no folder under the heading Activities without a folder. None of the three is a real name; each stands in for a field that was not filled in.
The subcontractor name comes from Subcontractors. If a company has been deleted there, the activity shows Deleted subcontractor; if none was ever assigned, No subcontractor assigned. Both can be picked from the filter.
Bulk selection only covers what is visible. The box in the header selects the activities that match the filter on screen. Putting a record hidden by a filter into a delete list would mean deleting something you cannot see.
8. Related sections
- Field Progress — the work items an activity covers are defined there, and marked Done or given a partial percentage there. Whether the bars fill depends on it.
- Progress Report — tells the status distribution of the same work items; this page spreads the same work across time.
- Subcontractors — the subcontractor list in the activity window and the Subcontractor Load sheet in the export are fed from there.
- Overview — reads the general progress of the project; the delay against the programme is here, the completion is there.
- Daily Report — writes how much of the planned work was actually done on site that day.