
Concrete Tracking
Concrete Tracking keeps a record of every concrete delivery that arrives on site. A truck mixer discharges in the field and a delivery ticket ends up in your hand;
1. What it is for
Concrete Tracking keeps a record of every concrete delivery that arrives on site. A truck mixer discharges in the field and a delivery ticket ends up in your hand; the counterpart of that note is one row here — which day, from which concrete supplier, to which location, in which class and how many cubic metres.
The page answers two questions together: how much concrete was poured and what it cost. Quantity is the site's question, amount is the accounts department's; because both sit on the same screen, you can answer "how many cubic metres did we pour this month and what does that come to" without opening a file.
Every pour that is saved with a price and a concrete supplier also lands in Accounts by itself: the concrete supplier gains a receivable from you and it appears in the ledger with its delivery ticket number. You do not have to make that transfer separately.
2. How to open it, who can see it
In the sidebar, Site Operations › Concrete Tracking.
| Your permission | What you can do |
|---|---|
| View | You see the list, the summary strip, the chart and the breakdowns. You can download Excel and PDF exports and open delivery ticket documents and save them to your computer. New pour, edit and delete buttons are not drawn at all |
| Edit | The same, plus you can add, edit and delete pours and restart the Accounts transfer |
| No permission | The module appears dimmed and locked in the menu |
3. Anatomy of the screen
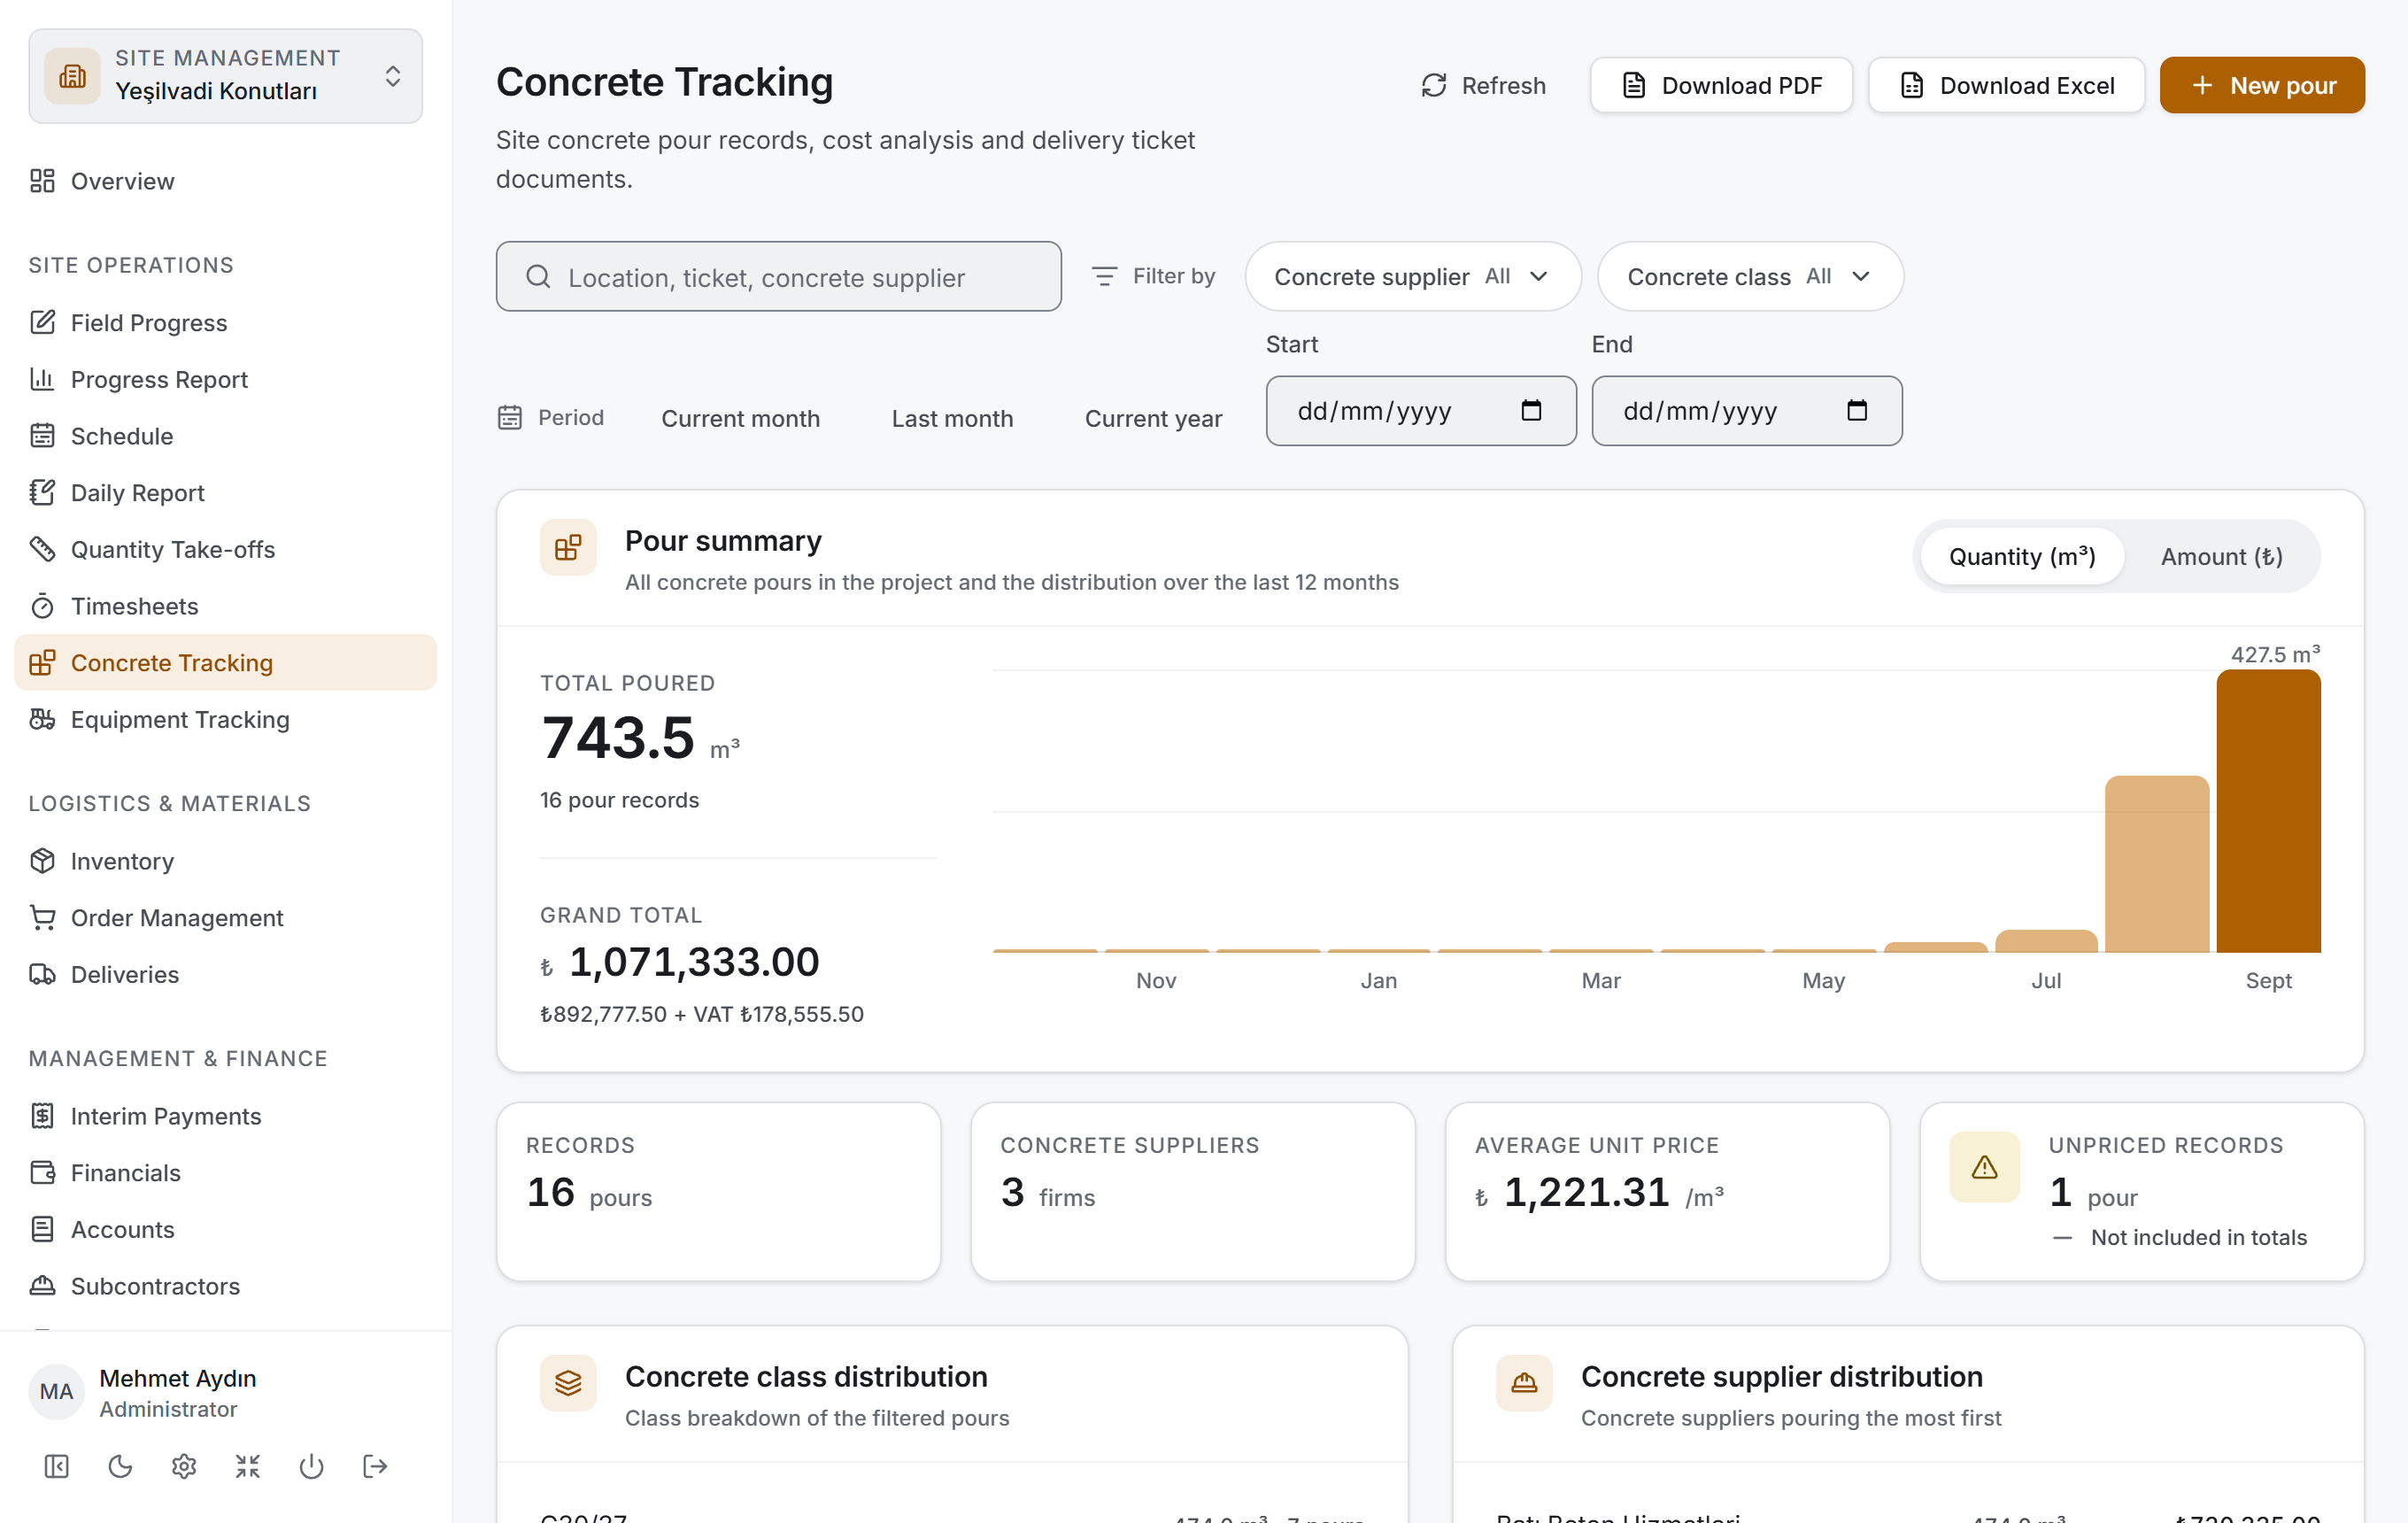
The page has four layers from top to bottom, and the order is deliberate: first you narrow, then you read the result as figures, then you look at its breakdown, and last you go down to the rows.
| Layer | What it does |
|---|---|
| Filter bar | Search, concrete supplier, concrete class and period |
| Pour summary | Two headline figures, a chart of the last twelve months, four small measures |
| Breakdown | Concrete class distribution and concrete supplier distribution |
| Pour list | A table grouped by day |
All three lower layers are drawn from the rows that pass the filter above. When you make a selection all four change at once and no request goes to the server — the project's data came down once.
Title and actions. The title reads Concrete Tracking with the description "Site concrete pour records, cost analysis and delivery ticket documents." On the right there are four buttons: Refresh, Download PDF, Download Excel and (if you have permission) New pour. Where the server has the samples section, a Test results menu sits among them as well (§6).
Filter bar

It has two rows. The upper row holds the Search pours box and, under the Filter by label, the Concrete supplier and Concrete class filters; the lower row holds the Period label, three ready-made ranges and two date boxes.
| Control | What it does |
|---|---|
| Search pours | Searches the location, section, delivery ticket no., concrete supplier name, concrete class and agreement name |
| Concrete supplier | Narrows by firm; each firm's pour count is shown beside it |
| Concrete class | Narrows by class. The list is not alphabetical but ordered by strength |
| Strength test | Shows pours with an Overdue or Due soon test (§5.9) |
| Current month · Last month · Current year | Ready-made ranges. The selected one is highlighted; pressing it again removes the range |
| Start · End | A free date range. If one is left blank there is no limit in that direction |
While a filter is active, a Clear filters button appears at the end of the bar with the number of active criteria on it. With no filter, that button is not drawn at all.
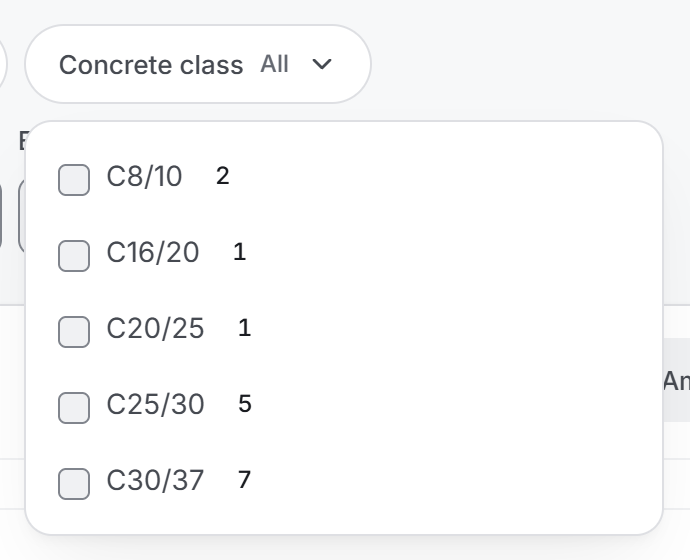
The filter menus feed one another: when you pick a concrete supplier, the counts in the class menu are recalculated for that firm's pours. So you can see whether ticking a second box will bring anything before you tick it.
Pour summary
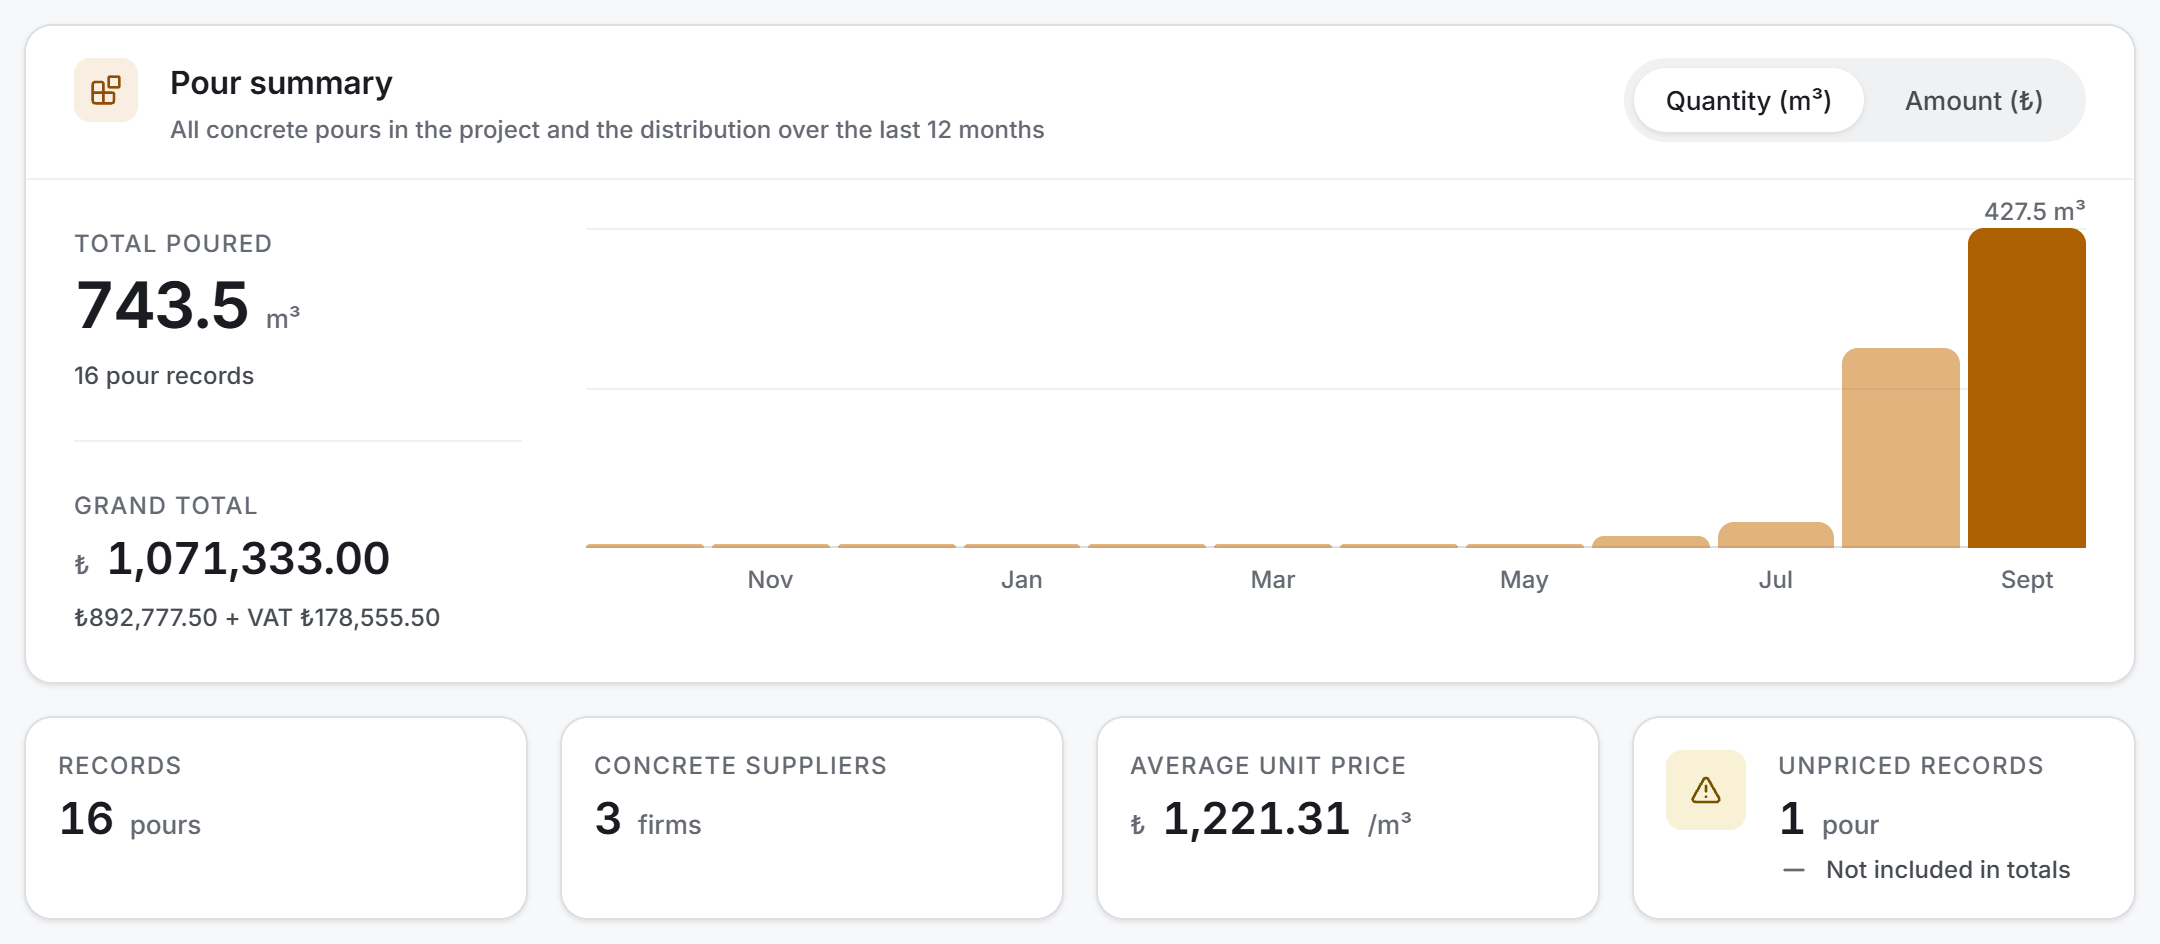
On the left of the card two headline figures sit one above the other:
| Measure | What it shows |
|---|---|
| Total Poured | The cubic metre total of the pours that pass the filter. The record count is written beneath it |
| Grand Total | The amount including tax. Beneath it the "amount + tax amount" breakdown is written |
On the right stands a column chart of the last twelve months. The Chart measure switch at the top right changes what the chart draws: Quantity (m³) or Amount (currency). The two do not have the same shape — a large pour of a cheap class is a peak on the quantity chart and middling on the amount chart.
Four small measures are lined up beneath the card:
| Measure | What it shows |
|---|---|
| Records | The number of pours that pass the filter |
| Concrete suppliers | How many different firms the concrete came from |
| Average Unit Price | The average price per cubic metre |
| Total tax | The tax total in the filter |
If there are records with no price entered, the fourth box gives way to the Unpriced Records counter; that box has an amber background and "Not included in totals" beneath it.
Breakdown
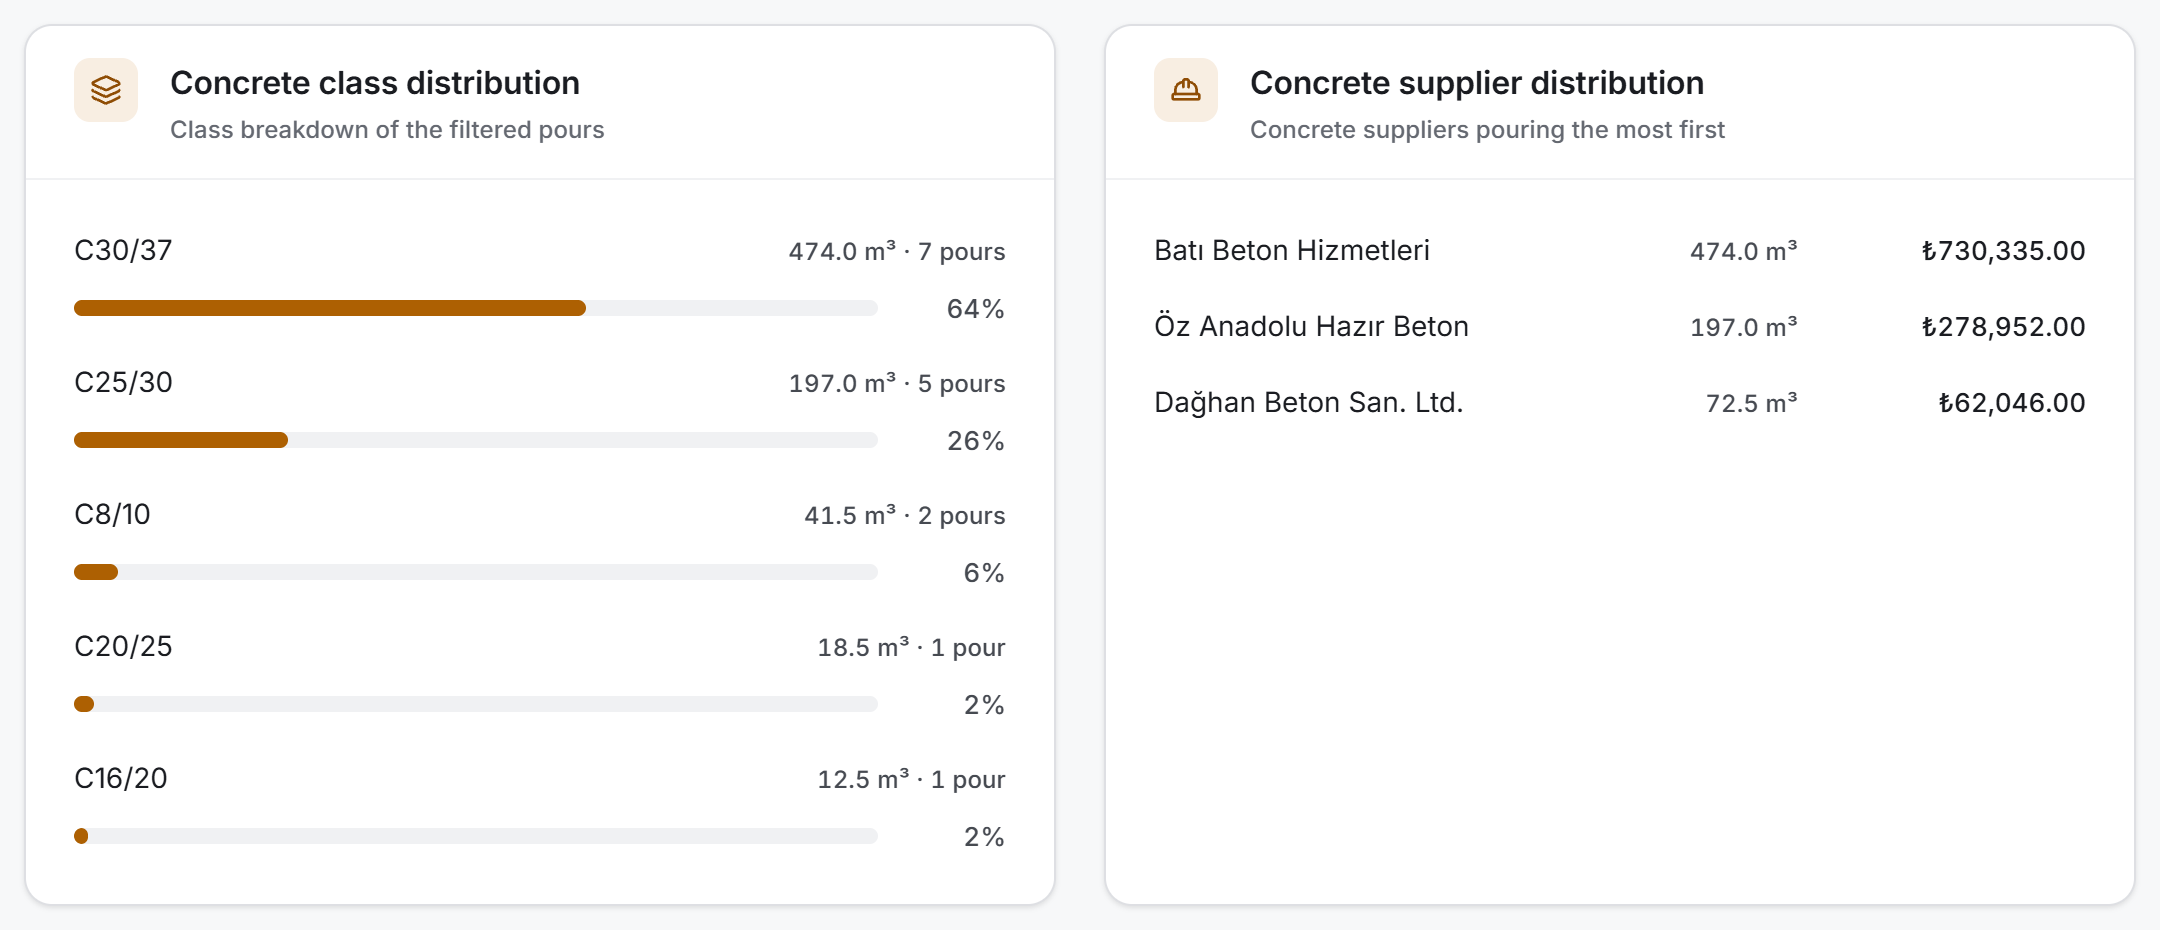
Two cards stand side by side and both are counted from the same rows:
- Concrete class distribution — each class's cubic metre total, pour count and percentage share. The share is shown with a bar; the card answers "how much of the total is which class".
- Concrete supplier distribution — how much concrete came from which firm and what amount it came to. The firm that poured the most is at the top. A firm with no amount shows a dash rather than a zero; that means no price has been entered on that firm's pours.
Pour list
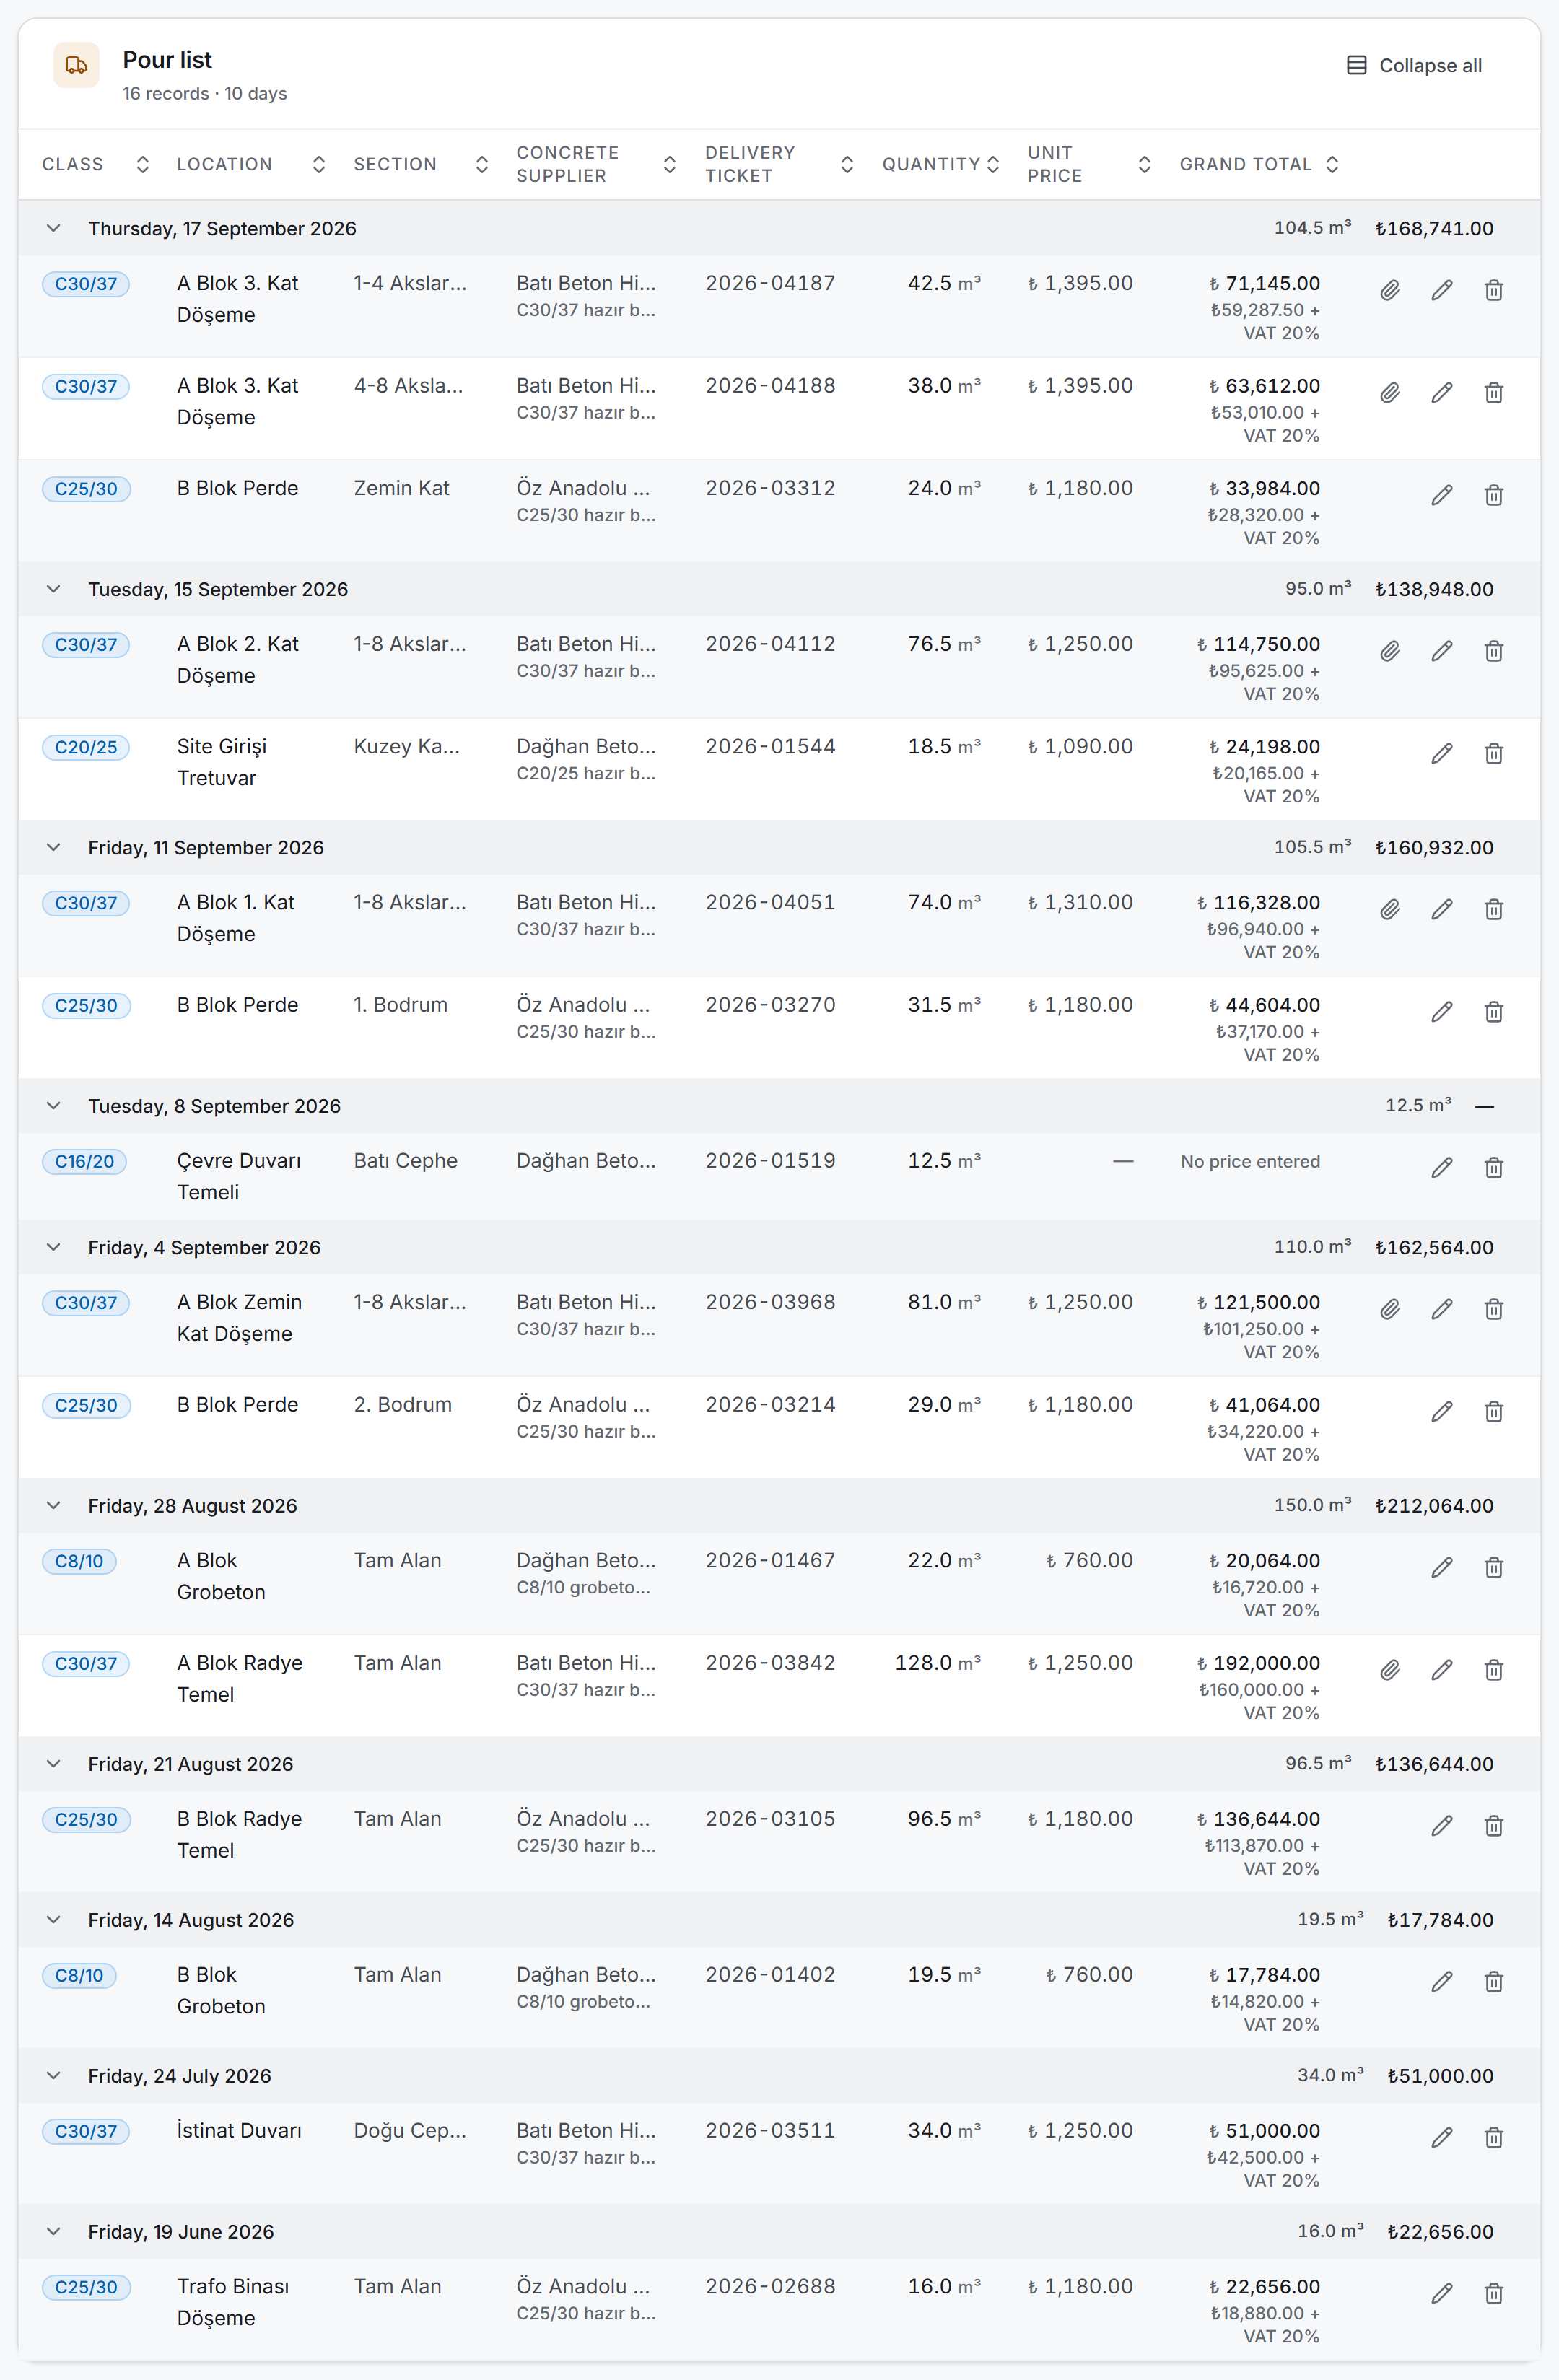
Rows are grouped by day. Each group's heading is the day written out in full — Thursday, 17 September 2026 — and to the right of the heading row the day's cubic metre total and its amount are written. The day name is not decoration: concrete pouring is work tied directly to weekends and to the weather.
Days are ordered from newest to oldest; records with no date entered collect in their own group at the very bottom. Clicking a group heading collapses that day, and the Collapse all button in the card header folds them all at once.
The columns from left to right:
| Column | What is in it |
|---|---|
| Class | The concrete class, as a badge |
| Location | Where the pour was made — the row's identity, written in bold. If pour times were entered they appear beneath it in small type |
| Section | The part within the location (axis range, floor, part of a block) |
| Concrete supplier | The firm name; beneath it, in small type, the agreement the price came from |
| Delivery ticket | The delivery ticket number |
| Quantity | Cubic metres |
| Unit price | The price per cubic metre; a dash if none was entered |
| Grand total | The amount including tax; beneath it the "amount + tax rate" line |
The rightmost column holds the row's buttons: a clipboard (opens the pour record, truck lines and samples), a paper clip (opens the delivery ticket) on records that have a document, and, if you have edit permission, a pencil and a waste bin. The paper clip is drawn only on records that really do have a document attached.
You can sort by clicking the headings. Sorting works inside the group: the order of the days is not disturbed, only that day's rows are rearranged.
Values that do not fit a column are shortened with an ellipsis — this is how long firm names, delivery ticket numbers and agreement names appear. Hold the pointer over one for a moment and the full text appears; if you need to read all of it, every value is complete in the Excel export.
On a row with no price entered the amount cell is not left blank, it reads "No price entered". This is a deliberate distinction: an empty cell and "0 ₺" look the same, yet one means free of charge and the other not yet known.
Empty screens
If the project has no pours at all, the filter bar, the summary strip and the breakdown cards are not drawn — with no filter to loosen, three cards saying "loosen the filter" would present a problem that does not exist as though it were yours. All that stands on the screen is a single card and, if you have permission, the New pour button.
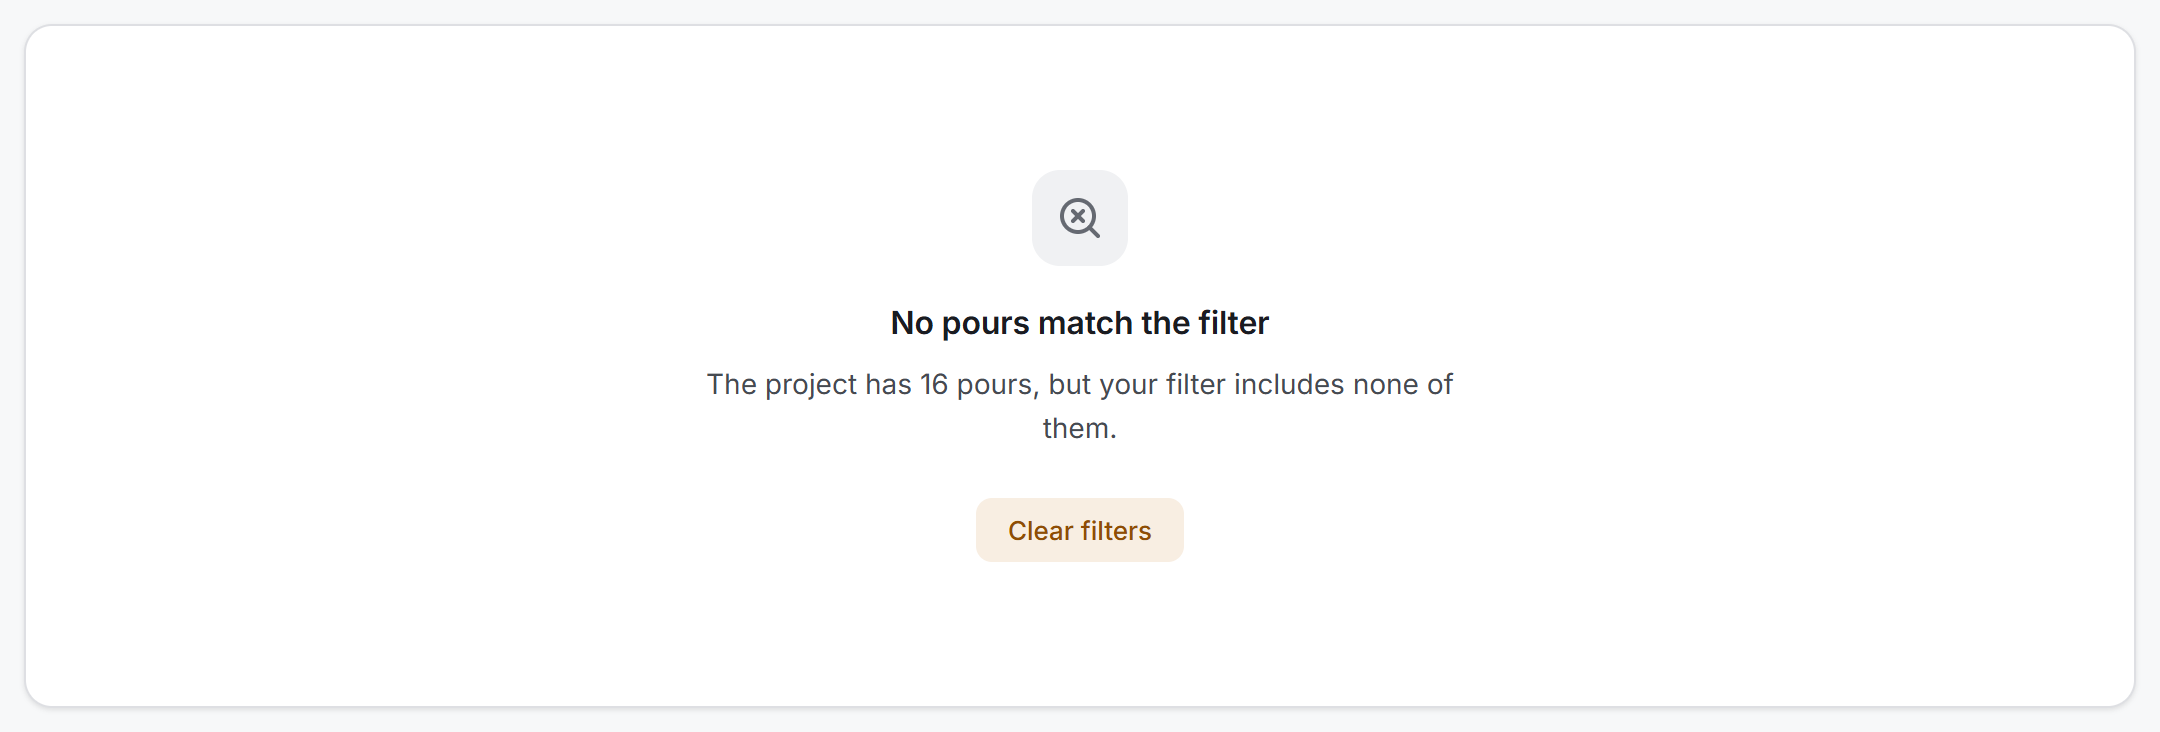
When there are records but the filter brings nothing, the filter bar stays where it is, the summary and breakdown cards are not drawn, and in place of the table there is a single card telling you how many pours the project has, with a Clear filters button.
4. Fields
The information held in a pour record:
| Field | Description | Required |
|---|---|---|
| Pour date | The day the concrete was poured. The list and the reports are grouped by it | Yes |
| Delivery ticket no. | The number on the ticket that came with the mixer | No |
| Concrete supplier | The firm supplying the concrete. The Accounts transfer depends on this field | No |
| Agreement | The contract the price comes from; selecting it fills the unit price box | No |
| Surcharge agreements | Items added on top of the main agreement (pump surcharge, winter additive, night premium) | No |
| Location | Where the pour was made — Building A, 3rd Floor Slab for instance | No |
| Section | The part within the location — Between Axes 1-4 for instance | No |
| Concrete class | Typed freely; the list that opens while typing and the arrow button at the right of the box suggest European (C30/37), Australian (N32) and US (4000 psi) classes. A new record opens with C30/37 (4000 psi if the company's region is the US) | No (it has a default) |
| Quantity (m³) | The amount of concrete poured | Yes |
| Unit price (currency/m³) | The price per cubic metre. Can be left blank and entered later | No |
| Apply tax | On a new record it follows the company: ticked, with the rate box filled with the company's tax rate (20% unless another rate is set in Settings), when the company has a tax; unticked when No tax is chosen in Settings. When editing, as in the record | No |
| Delivery ticket document | A PDF or a photo. One document, at most 50 MB | No |
| Start and finish time | In the Pour record section, written as 08:30. If the finish is before the start, the pour is treated as running into the next day and the list shows +1 day | No |
| Slump (mm) | A whole number from 0 to 300 | No |
| Concrete and air temperature (°C) | At most one decimal. 0 and minus values are valid; a blank box means "not entered". Concrete from −20 to 80, air from −60 to 60 | No |
| Admixture | Free text, at most 200 characters | No |
| Pump and pump type | Not specified, Yes or No. If Yes, the type: Truck-mounted boom, Static line, Other. For information only, it does not change the amount; whether the pump is included is stated in the agreement's unit price | No |
Three values are not entered but calculated:
| Calculated | How it comes out |
|---|---|
| Amount | Quantity × unit price |
| Tax amount | Amount × tax rate |
| Grand total | Amount + tax amount |
All three appear in the Calculated amount box on the form before you save. Beneath it the working is written out: 46.5 m³ × ₺1,250.00 = ₺58,125.00 + VAT 20% (₺11,625.00) — here for a Turkish company; your screen shows your own currency and tax name.
5. Step by step
5.1 Recording a pour
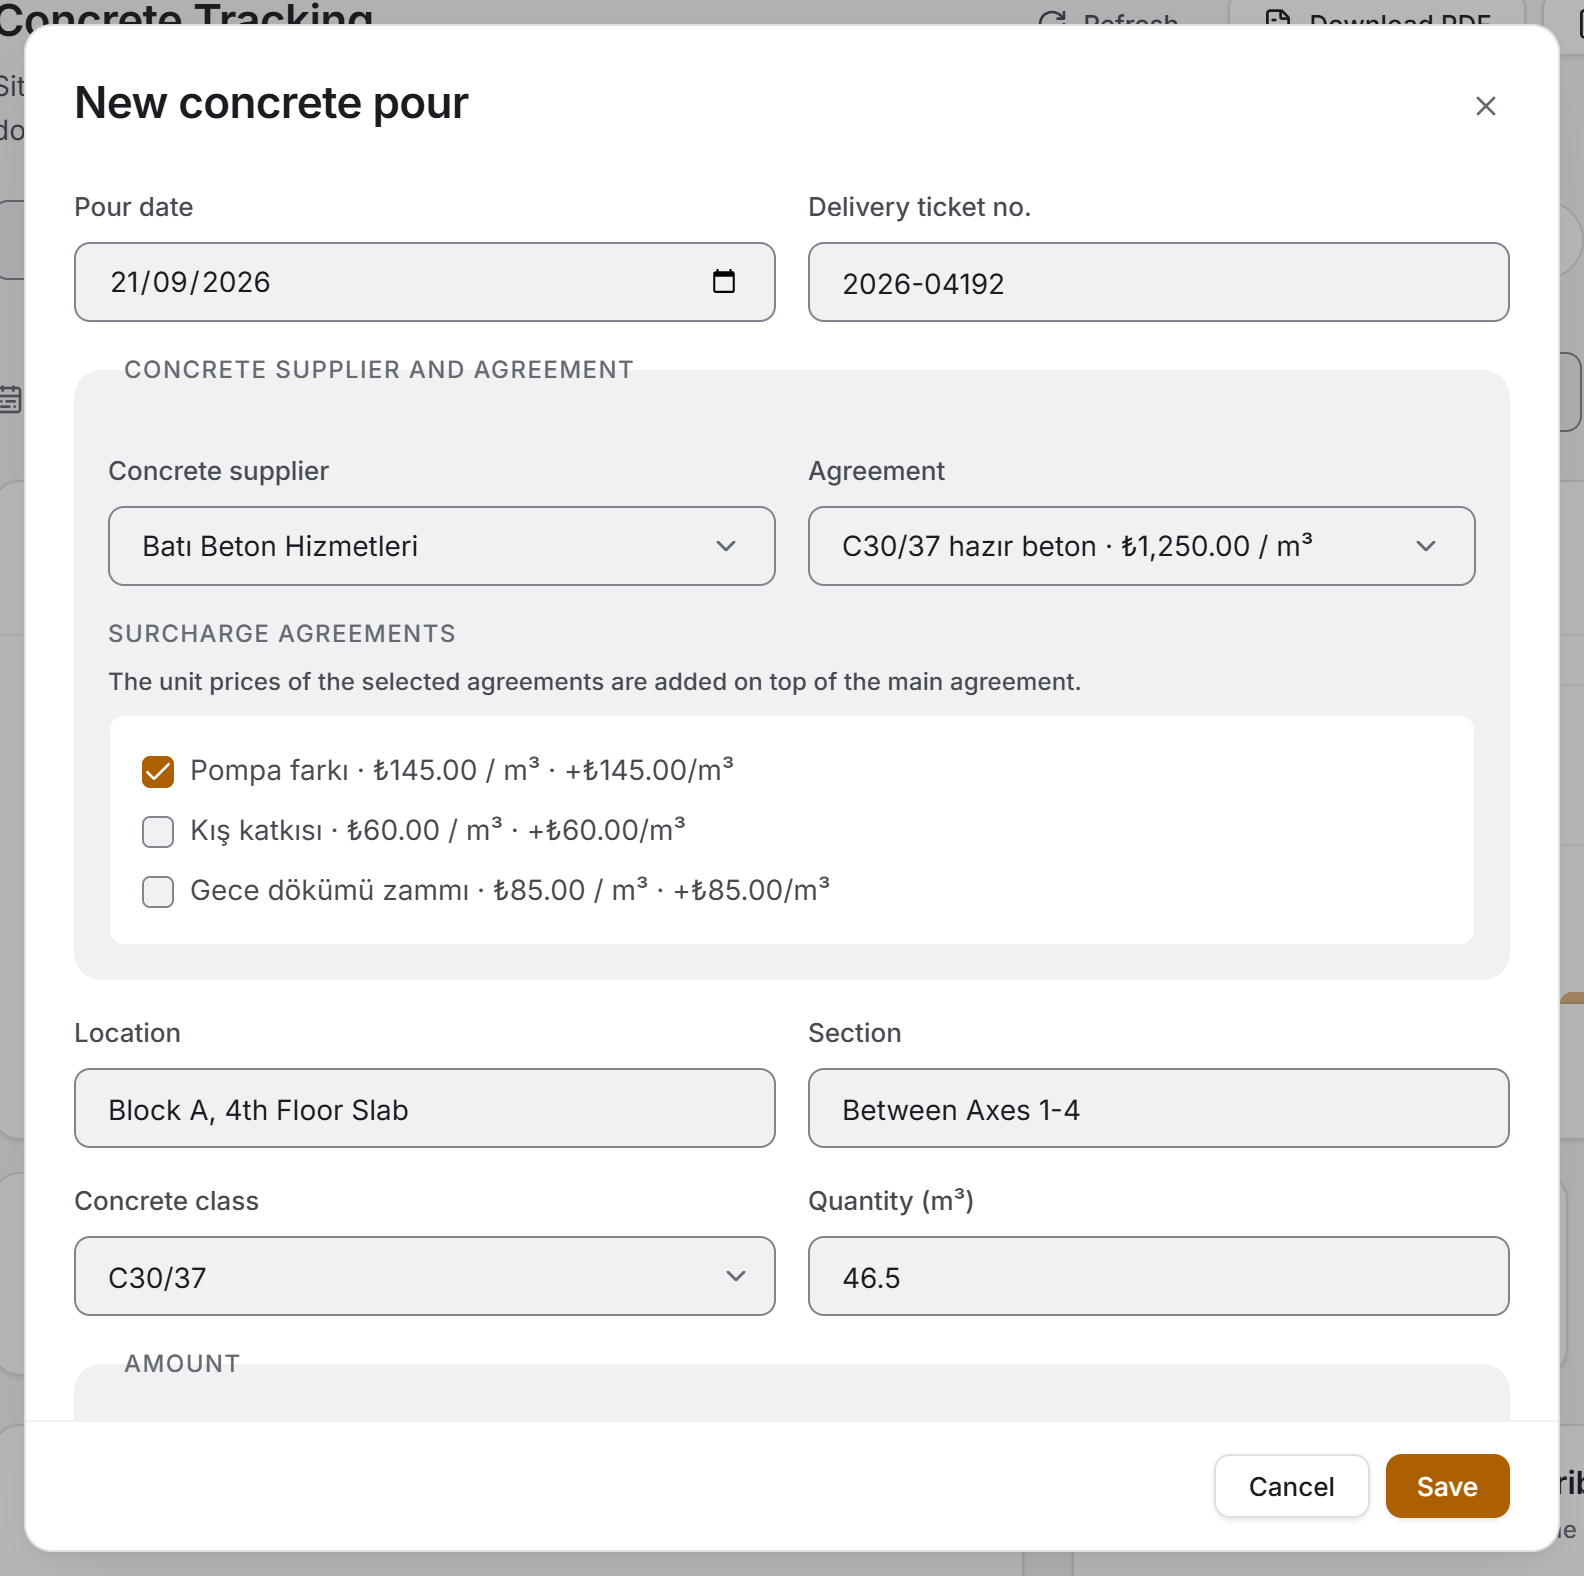
- Press the New pour button.
- The Pour date opens on today; change it if the mixer came on another day.
- Type the number from the ticket into Delivery ticket no.
- In the Concrete supplier and agreement section pick the firm, then pick the Agreement if there is one. The moment an agreement is selected the unit price box fills by itself.
- Write where the pour was made into Location and Section.
- Type the Concrete class or pick a suggestion, and enter the Quantity.
- If you wish, open the Pour record section and enter the times, slump, temperatures, admixture and pump. The section starts closed on a new record; all of it is optional and does not affect the amount.
- Change Apply tax and the rate if needed.
- Add the photo or the PDF of the delivery ticket to the Delivery ticket document field.
- Press Save.
Two fields are required: pour date and quantity. Warnings appear only after you have tried to Save — seeing a red warning at first glance would put on you a mistake you have not yet made.
5.2 Surcharge agreements and the unit price
A pour's unit price may not come from a single agreement. Separate agreements such as a pump surcharge, a winter additive or a night premium are added on top of the main agreement. When you select the main agreement, that concrete supplier's other agreements are listed with tick boxes under the Surcharge agreements heading; beside each one is what it adds per cubic metre.
Every surcharge you tick is added to the unit price and the box is recalculated at once.

If you change the concrete supplier, the agreement and surcharge selections are reset — another firm's agreement cannot stay selected.
5.3 Attaching and viewing the delivery ticket

The document field accepts PDF, JPG, PNG and WEBP; the limit is 50 MB per file. One record holds one document; choosing a new file replaces the previous one.
In the list, a row that has a document ends with a paper clip button. Pressing it opens the document in a window:
- If it is a PDF, the window's own viewer opens it; zooming and printing come from there.
- If it is a photo, you zoom with the plus and minus buttons or with the mouse wheel, and you move a zoomed image around by dragging it. The Fit button puts the image back inside the window.
The Save to computer button at the bottom of the window downloads the document to disk. That is the way to send a delivery ticket to the accounts department.
5.4 Editing a pour
Press the pencil button at the end of the row. The form opens with the saved values; change them and press Update. If the saved concrete class is a value that is not among the suggestions (something typed by hand such as C25), it stays in the box as it is rather than being written over.
Updating also refreshes the linked transaction in Accounts; no second entry is created in the ledger. The server brings the transaction into line together with the pour, so when a user who is not an administrator changes the quantity or the price, Accounts shows the new amount too.
5.5 Deleting a pour
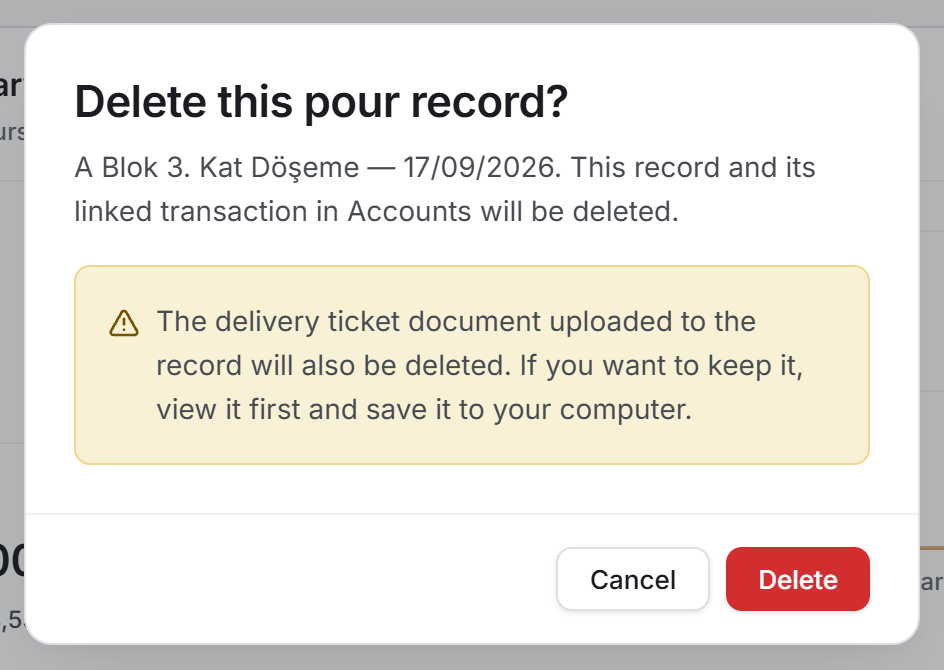
The waste bin button at the end of the row opens a confirmation screen. It says which record will be deleted (location and date) and tells you that the record's linked transaction in Accounts will be deleted as well.
The server deletes the pour record and its linked transaction in Accounts together: either both go or both stay, and no transaction is left in the ledger without a source. Anyone with permission to edit pours can do this; deleting the transaction by hand in Accounts is still an administrator's job.
5.6 Searching and narrowing
The Search pours box looks at the location, the section, the delivery ticket number, the concrete supplier name, the concrete class and the agreement name all at once.
There are two ways to choose a period. Current month, Last month and Current year are one click; a range such as 15 March – 2 April is entered in the two date boxes. If you fill in only one of the boxes, there is no limit in the other direction.
5.7 If the Accounts transfer is left unfinished
When a pour is saved the application does two things: it writes the pour record first, then posts the transaction to Accounts. If the second fails, the pour has still been saved — do not enter the record a second time.
In that case an amber strip appears at the top of the page and says why. There are two reasons and their remedies differ:
| What the strip says | What to do |
|---|---|
| The subcontractor has no account, and only administrators can open new accounts | An administrator creates the firm once in Accounts; later records are transferred by themselves |
| The server could not be reached | Press the Resend to Accounts button on the strip when the connection is back |
Editing an existing pour does not bring up a strip: the server updates the linked transaction together with the pour. If you change the concrete supplier to a firm that has no account yet, the transaction stays with the old firm; it moves at the first edit after an administrator opens the new firm's account.
The Resend to Accounts button is drawn only for users with edit permission, and it transfers all of the project's pours again. When it finishes, a green strip says how many records were written, how many were removed from the ledger and, if any, how many orphaned transactions were cleaned up.
5.8 Truck lines
You can enter the trucks that brought a pour, line by line. All of it is optional; without any lines the pour saves as before. Lines attach to a saved pour, so save the pour first.
- In the list, press the pour's clipboard button. The window shows the pour record and, below it, the Trucks section.
- Choose Add truck.
- Fill in what you know: Delivery ticket no., Registration, Quantity (m³), Left plant, Arrived on site, Discharged. Times are written as 08:30. At least one field must be filled in; a quantity, if entered, must be above zero.
- Choose Save. Correct a line later with the pencil and delete it with the waste bin.
If a time is earlier than the one before it, the truck is treated as having passed midnight and +1 day appears beside it: left at 23:40, arrived at 00:10, for example.
Anyone who can see Concrete Tracking can read this section. Adding, correcting and deleting need edit permission on both the project and Concrete Tracking.
If the lines total differs from the pour quantity, the window says so and, if you have edit permission, a Set pour quantity to the lines total button appears. It first shows the new quantity and new grand total and asks you to confirm. If you confirm, the quantity is written, the amount is worked out as the new quantity × unit price, and the account entry is updated as in a normal save. A line with no quantity is not in the total, and the window says how many there are.
When you delete a pour, its truck lines are deleted too.
5.9 Samples and strength tests
You keep the samples taken from a pour and their 7 and 28-day strength results in the same window. All of it is optional; without any samples the pour saves as before.
- In the list, press the pour's clipboard button and go down to the Samples section.
- Choose Add sample.
- Fill in what you know: Sample ID and Specimens. At least one field must be filled in. Specimens is a whole number from 1 to 9999.
- Choose Save. When the results are in, open the sample with the pencil and fill in 7-day strength (MPa), 28-day strength (MPa) and the result boxes. Delete a sample with the waste bin.
Strength is from 0 to 300 MPa with at most two decimals. An empty box means "not entered"; 0 means zero. MPa is the only unit.
The test date is worked out from the pour date: 7 and 28 days later. You do not enter it and cannot change it by hand. If you correct the pour date, the test dates change with it. A pour with no date has no test dates and no reminder.
You mark Pass or Fail yourself. The app does not compare the strength with the concrete class, because the acceptance criteria vary by country and specification.
The reminder is on the Concrete Tracking page; it does not go to a phone or by email. A test with no result counts as overdue once its date has passed and as due soon with 3 days or fewer left. The strip at the top of the page counts and lists these samples; pressing a pour's name opens its window, and Show these pours narrows the list. In the list, Test overdue or Test due soon appears under the pour's location, and the Strength test filter in the filter bar selects the same pours. If you dismiss the strip with Close, it comes back when the page is next opened.
Entering either a strength or a mark closes that test's reminder. Once a 28-day result is in, the 7-day test is no longer asked for.
Anyone who can see Concrete Tracking can read this section. Adding, correcting and deleting need edit permission on both the project and Concrete Tracking.
When you delete a pour, its samples are deleted too.
6. Exports
The list export comes in two formats (Excel and PDF) and both send out the list as it appears on the screen — whatever the filter is, that is what goes into the file. On top of these there are the test results table and the pour report for a single pour (below). There is no separate export window; you have already made your choice in the filter bar.
The file names start with Concrete_Tracking_ and a date–time stamp is added to the end. If you close the save window nothing happens; when it is saved, a strip appears at the top of the page with the file's full path on it.
Download Excel
The workbook carries fourteen columns: Date · Concrete supplier · Agreement · Delivery Ticket No. · Location · Section · Class · Quantity (m³) · Unit Price · Amount · Tax (%) · Tax Amount · Grand Total · Document.
At the top there are three heading lines: the project name; the report date, the record count, the total poured and the grand total; and a one-line summary of the filter that was applied. That last line matters — it is written so that a file taken with a concrete supplier selected is not mistaken for the whole project when it is sent by e-mail. If there are records with no price, the heading also carries the note "No price in N records".
At the end of the list there is a GRAND TOTAL row; it totals the quantity, amount, tax and grand total columns and matches the summary on the screen exactly.
If a record with a pour record is in the list, six columns are added on the right: Pour times (for example 22:00–03:30 (+1 day)), Slump (mm), Concrete temperature (°C), Air temperature (°C), Admixture, Pump. If a record with truck lines is in the list, three more columns follow: Trucks (number of lines), Trucks total (m³) and, when the lines total differs from the pour quantity, Trucks difference (m³). An empty field is an empty cell; 0 °C and 0 mm are written as numbers. The first fourteen columns, their order and their totals do not change. The file for a list with no pour records and no truck lines is the same as before.
Three useful details: the header row comes frozen, so the column names stay on screen as you scroll down; the filter is on, so you can ask your own question; and the date and all the figures are real number cells — they can be sorted, added up and pivoted.
Download PDF
A4 landscape, a list of twelve columns. Of Excel's fourteen columns the cubic metre heading has been shortened and the document column left out.
The first page carries the project name, the module name, the time it was produced and the filter summary; at the top right stand the total quantity and the grand total. From the second page on, a thin strip is repeated at the top, the column headings are written again on every page, and the page number sits at the bottom. The last row is the total row and is separated by the heavy rule above it.
No columns are added: the pour record and the truck lines are written in the Location cell as two small lines under the location (22:00–03:30 (+1 day) · Slump 120 mm · Concrete 0 °C · … · Pump: Static line and 3 trucks, 15.5 m³ · difference -0.5 m³).
Test results
Choose Download Excel or Download PDF from the Test results menu in the header. The menu only appears where the server has the samples section. The table gives the samples of the pours shown on the screen, in pour order; if the Strength test filter is set, only samples in that state remain. The file name starts with Concrete_Test_Results_.
Thirteen columns: Pour date · Location · Section · Class · Sample ID · Specimens · 7-day test date · 7-day (MPa) · 7-day result · 28-day test date · 28-day (MPa) · 28-day result · Status. Status is the same calculation as the reminder on the page: Overdue, Due soon (with the test and the days left), Complete once the 28-day result is in, otherwise Scheduled; No date for a pour without a date. The heading gives the number of samples, the count for each status and how many samples are marked Fail. An empty strength is an empty cell; 0 MPa is written as a number. The PDF is A4 landscape. If the selected pours have no samples, the file says so in one sentence.
Pour report
A PDF for a single pour. Take it with the Pour report (PDF) button at the bottom of the window opened by the pour's clipboard button; anyone who can see Concrete can take it. The file name starts with Pour_Report_ and the page is A4 portrait.
In order, the report gives: the pour details (date, concrete supplier, agreement, delivery ticket, location, section, class, quantity, unit price, amount, tax and grand total, as on the screen); the pour record (No pour record entered. if there is none); the truck lines, the lines total and the pour quantity, the number of lines with no quantity and, if there is a difference, a sentence such as The lines total is 0.5 m³ less than the pour quantity.; and the samples with their test status. Where the server has no truck or samples section, that heading is not printed at all.
7. What you need to know
A record with no price entered does not go into the totals. Such a record is not counted as zero and added in; the table reads "No price entered", the summary strip counts it with the Unpriced Records measure and a note is added to the Excel heading. If you are reading a Grand Total on the page, you can also see from the same screen how many records that total does not cover.
The price stays in the record, it is not recalculated from the agreement. If an agreement's unit price changes later, the amounts of past pours do not change. That is the right behaviour: the delivery ticket was issued, and it was issued at that day's price. The new price applies only to records made from then on.
Not every pour goes to Accounts. A pour with no concrete supplier selected or no price entered is not transferred to the ledger — its cost is not yet settled. When you later enter a concrete supplier and a price on such a record, the transfer happens by itself.
A pour with no date entered is not transferred to the ledger either; an account transaction needs a date. Because the date is required on this page, this only happens with undated records from the old program. A bulk resend counts them as skipped; once you edit the pour and enter its date, it is transferred.
The average unit price is weighted. It is not the flat average of the prices but the total amount divided by the total quantity. Averaging the prices of two pours, one of 5 m³ and one of 500 m³, with equal weight would show the project's real cost wrongly.
A concrete class is not a status but a property. All the badges are the same colour; blinding concrete is meant to be C8/10, it is not "bad". That is also why the filter list is ordered by strength rather than alphabetically — in alphabetical order C12/15 comes before C8/10 and the list reads backwards.
The class box is free; the list only suggests. A value that is not in the list (C25, BS20) can be typed and is saved as written. Only when it matches a suggestion apart from case and spaces is the suggestion's spelling used (c30 / 37 → C30/37, 4000PSI → 4000 psi), so the same class does not become two rows in the filter and the breakdown. A blank class shows as No class entered. The filter options come from the records, so older values typed by hand appear there too; opening and closing a record does not change its class.
The concrete supplier and agreement lists come from the Subcontractors module. If a firm is missing from the dropdown, or an agreement does not appear, it has to be defined there first.
The search hint is incomplete. The hint inside the box names three fields; the search also looks at the section, the concrete class and the agreement name.
8. Related chapters
- Subcontractors — the firms supplying the concrete and the agreements the price comes from are defined there.
- Accounts — every priced pour that is saved lands in the ledger as a receivable of the concrete supplier.
- Financials — the project's concrete cost is collected there together with the other cost items.
- Overview — concrete pouring also appears as an item in the project's summary.